If you are preparing for a DevOps interview or for a Python developer, consider this guide as your friend to practice Python interview questions: learn python the hard way and answers and help you pass the exam or interview.
Without further delay, let’s get into this Ultimate Python interview questions and answers guide, where you will have 20 questions to practice.
Q1. What is difference between List and Tuple in Python?
Answer: Lists are mutable i.e they can be modified and Tuples are immutable. As you can see in the below code the list can be modified however Tuples are not modifable.
List = ["a","i",20]
Tuples = ("a","i",20)
List = ["a","i",20]
Tuples = ("a","i",20)
print(List)
print(Tuples)
List[1] = 22
print(List)
Tuples[1] = "n"
print(Tuples)
After running the above code, you will notice that the Lists can modify, but the Tuples are not.
Running Python code to modify list and tuple
Q2. What are key features of Python.
Answer: Python is interpreted language, that means it doesn’t required to be compiled. It can be used in various automation areas such as AI technologies, easier to understand and write language. The Latest version of Python is 3.10
Q3. Give Examples of some famous Python modules?
Answer: Some of the example of Python modules are os, json, sys, math, random, math
Q4. What are local and global variables in Python ?
Answer: Local Variables are declared inside the function and scope is inside function only however global variables are those variables whose scope is for entire program.
Q5. What are functions in Python ?
Answer: This is a block of code which is only executed when called. To declare the function you need use the below syntax def < function-name> and call it using <function-name> as shown below.
def function(n):
     a, b = 0, 1
     while a > n:
         print(a)
         print(b)
     print(n)
function(200)
python shanky.py
Running Python function
Q6. What is __init__ ?
Answer: This is a method which automatically allocate memory when object or instance is created. All the Classes have __init__method.
Q7. What is the Lambda function in Python?
Answer: Lambda functions are also known as the anonymous function, which takes any number of parameters but is written in a single statement.
square = lambda num: num ** 2
Q8. What is self in Python?
Answer: self is an instance or object of a class. This is used with __init__ function and is explicitly included as first parameter.
Q9. How can you Randomize the list in Python ?
Answer: To randamize the list in Python consider importaning random module as showb below.
from random import shuffle
list = ["a" , "b" , "c" ,"d", "e"]
shuffle(list)
print(list)
Q10.What does *args and *Kargs mean ?
Answer: The *args are used when you are sure about the number of arguments that you will pass in a function. Similarly * Kargs are keyword arguments where you are not sure about number of argument but they are declared in the dictionary formats.
Q11. Does Python Supports OOPs concept?
Answer: Yes , Python does support OOPs concept by creating classes and objects . Backends determines where state is stored or loaded from. By default we have local backend but we can give remote backed such as S3
Q12. Name some Python Libraries ?
Answer: The Python libraries are collection of built-in modules (written in C) that provide access to system functionality such as file I/O that would otherwise be inaccessible to Python programmers, as well as modules written in Python that provide standardized solutions for many problems that occur in everyday programming. For example Pandas, Numpy etc.
Q13. What are various ways to import the modules in python?
Answer:
import math

import math as mathes ( Alias name )
from flask import Flask
Q14. What is Python Flask?
Answer: Python flask is a web framework which makes life of developer easy by reusing the code, extensions for operation to build a reliable, scalable and maintainable web apps. With Python flask web frameworks, you can create and build from static to dynamic applications and work with API requests.
There are different Python Web frameworks apart from Python flask such as TORNADO, PYRAMID and DJANGO .
Understanding the difference between high level and low level language.
Interpreted v/s Compiled Language
Introduction to Python
How Python Works ?
Python Interpreter
Python Standard Library
Python Implementations
Python Installation
Python Installation on Linux Machine
Python Installation on Windows Machine
Python Installation on MacOS
Conclusion
Understanding the difference between High & Low-level Languages
High-Level Language: High-level language is easier to understand than is it is human readable. It is either compiled or interpreted. It consumes way more memory and is slow in execution. It is portable. It requires a compiler or interpreter for a translation.
Low-Level Language: Low-level Languages are machine-friendly that is machines can read the code but not humans. It consumes less memory and is fast to execute. It cannot be ported. It requires an assembler for translation.
Interpreted v/s Compiled Language
Compiled Language: Compiled language is first compiled and then expressed in the instruction of the target machine that is machine code. For example – C, C++, C# , COBOL
Interpreted Language: An interpreter is a computer program that directly executes instructions written in a programming or scripting language, without requiring them previously to have been compiled into a machine language program and these kinds of languages are known as interpreter languages. For example JavaScript, Perl, Python, BASIC
Introduction to Python
Python is a high-level language, which is used in designing, deploying, and testing at lots of places. It is consistently ranked among today’s most popular programming languages. It is also dynamic and object-oriented language but also works on procedural styles as well, and runs on all major hardware platforms. Python is an interpreted language.
How does Python Works?
Bytecode, also termed p-code, is a form of instruction set designed for efficient execution by a software interpreter
First step is to write a Python program such as test.py
Then using Python interpreter program is in built compiled and gets converted into byte code that is test.pyc.
Python saves byte code like this as a startup speed optimization. The next time you run your program, Python will load the .pyc files and skip the compilation step, as long as you haven’t changed your source code since the byte code was last saved.
Once your program has been compiled to byte code (or the byte code has been loaded from existing .pyc files), it is shipped off for execution to something generally known as the Python Virtual Machine
Now byte code that is test.pyc is further converted into machine code using virtual machine such as (10101010100010101010)
Finally Program is executed and output is displayed.
Python Interpreter
Python includes both interpreter and compiler which is implicitly invoked.
In case of Python version 2, the Python interpreter compiles the source file such as file.py and keep it in same directory with an extension file.pyc
In case of Python version 3 : the Python interpreter compiles the source file such as file.py and keep it in subdirectory __pycache__
Python does not save the compiled bytecode when you run the script directly; rather, Python recompiles the script each time you run it.
Python saves bytecode files only for modules you import however running Python command with -B flag avoids saving compiled bytecode to disk.
You can also directly execute Python script in the Unix operating system if you add shebang inside your script.
#! /usr/bin/env python
Python Standard Library
Python standard library contains several well-designed Python modules for convenient reuse like representing data, processing text, processing data, interacting with operating systems and filesystems, and web programming. Python modules are basically Python Programs like a file (abc.py) that are imported.
There are some extension modules that allows Python code to access functionalities supplied by underlying OS or other software’s components such as GUI, database and network, XML parsing. You can also wrap existing C/C++ libraries into python extension modules.
Python Implementations
Python is more than a language, you can utilize the implementation of Python in many ways such as :
CPython:CPython is an interpreter, compiler, set of built in and optional extension modules all coded in C language. Python code is converted into bytecode before interpreting it.
IronPython: Python implementation for the Microsoft-designed Common Language Runtime (CLR), most commonly known as .NET, which is now open source and ported to Linux and macOS
PyPy:PyPy is a fast and flexible implementation of Python, coded in a subset of Python itself, able to target several lower-level languages and virtual machines using advanced techniques such as type inferencing
Jython: Python implementation for any Java Virtual Machine (JVM) compliant with Java 7 or better. With Jython, you can use all Java libraries and framework and it supports only v2 as of now.
IPython: Enhances standard CPython to make it more powerful and convenient for interactive use. IPython extends the interpreter’s capabilities by allowing abbreviated function call syntax, using question mark to query an objects documentation etc.
Python Installation
Python Installation on Linux Machine
If you are working on the Latest platforms you will find Python already installed in the systems. At times Python is not installed but binaries are available in the system which you can install using RPM tool or using APT in Linux machines and for Windows use MSI( Microsoft Installer ) .
Python V2 comes installed on macOS but you should install the latest Python version always. The popular third-party macOS open-source package manager Homebrew offers, among many other packages, excellent versions of Python, both v2 and v3
To install Homebrew, open Terminal or your favorite OS X terminal emulator and run
Verify the installation of Python using below command
Conclusion
In this tutorial, you learned a basic introduction to python, why it is interpreted, and high-level language. Also, you learned lots of details of python data types, keywords, and how python works. There were a handful of examples that you learned. Hope this tutorial will help you and if you like please share it.
You might be already aware of difference between low level and high level language. Buts lets quickly see what are main difference between the both. High level language such as c , c ++ and python are portable , human friendly, that is they are easier to debug and understand while writing the programs. They need either compiler or interpreter to run the programs.
On the other hand, Low level language such as machine language or assembly level language they are difficult to understand and are written in assembly language which are converted using assembler.
In case of Linux distributions Python programming language by default , but in windows it does not come with it. In this tutorial, we will learn what is python which is widely used in artificial intelligence, by astronauts, by developers for creating the apps. Learning and setting python on windows is a need of the hour. So lets get started with it.
Table of content
What is Python?
Prerequisites
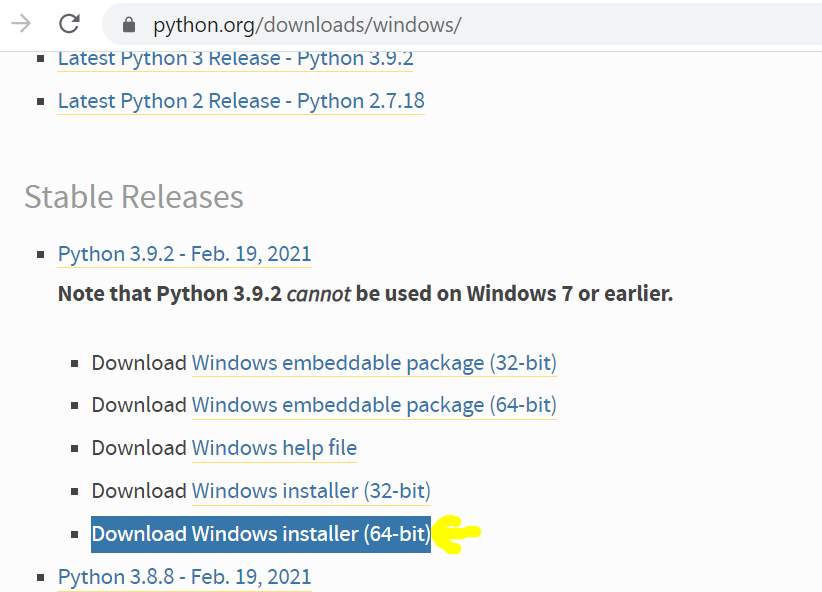
How to install Python on windows machine?
A simple python code to start your day
Conclusion
What is Python?
Python is a high level , oops based , interactive and a general purpose scripting programing language. Python is very easier to understand and readable. It focuses on object over functions. Python is also a interpreted language because it converts codes in machine level code even before it runs. It works on variety of protocols such as https, ftp , smtp and many more. The latest version is 3.9.2 which was released on December 2020. Python works very well with most of the such as atom, notepad ++ , vim.
Prerequisites
Windows 7 + operating system with admin rights
Command Prompt which is already present in windows operating system
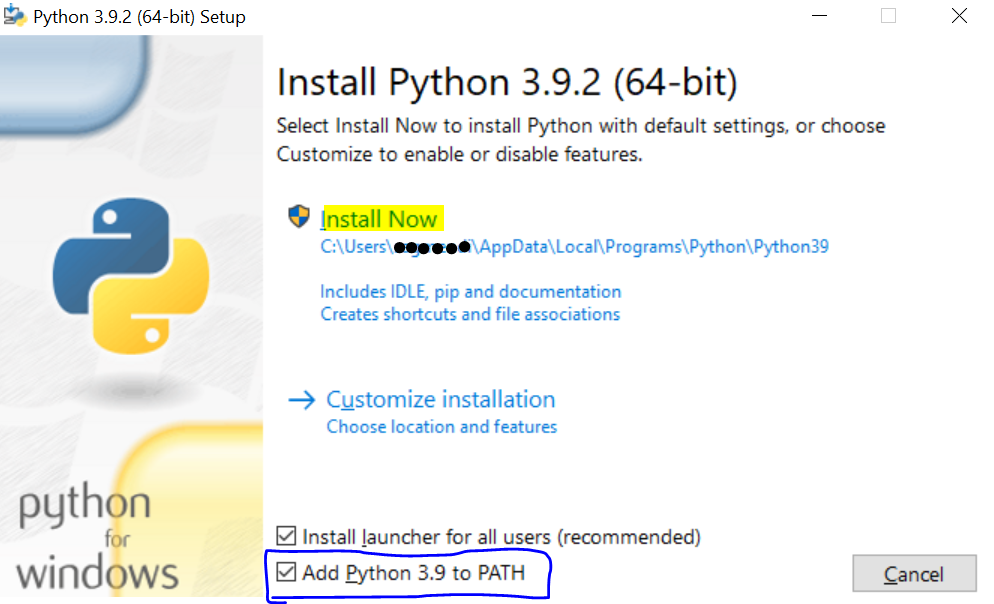
Now run the executable installer which got downloaded.
Next step will prompt you to select whether to Disable path length limit , you ignore it or disable it.
Now python should be installed on your windows machine.
Verify Python Was Installed On Windows
Now Navigate to command prompt and type python
Pip is basically python package manager which is used to fetch lots of other additional modules. Pip comes with most of pythons executable. To check if it is installed use
pip -V
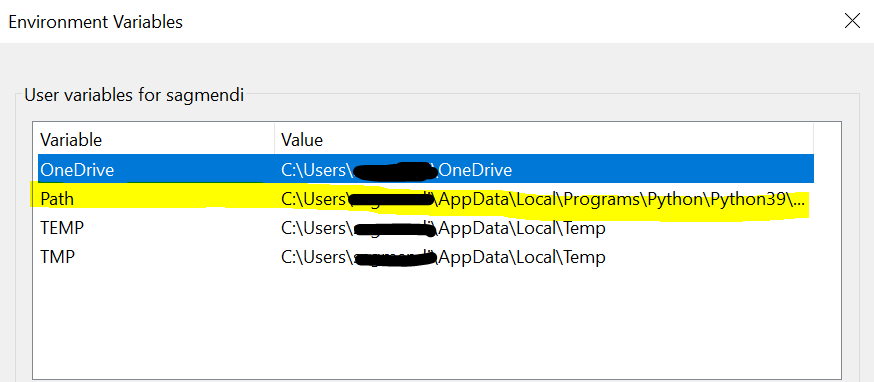
To verify if python environmental variables was successfully added. Search for sysdm.cpl and click on edit environmental variables.
A simple python code to start your day
Create a simple file main.py on your desktop
mystring = " This is Author of Automateinfra and its time to start learning python"
mylist   = [letter for letter in mystring] # This is function which iterates over each alphabet in mystring
print(mylist)       # This will print the result of mylist
Navigate to your desktop location on command prompt and use below command to run your first program in python
python main.py
Great work ! python was installed successfully and we could run our first program of python quickly.
Conclusion
In this tutorial we covered basic difference between high level language and low level language. We also discussed what is python and how to install python on windows machine to get you started in organization scripting and automation work.
Hope this tutorial will helps you in understanding and setting up Python on Windows machine.
If you are looking to create Python applications or programs that allow you to work with various API requests, nothing could be better than one of the most widely used web frameworks, Python flask.
With Python flask web frameworks, you can create and build from static to dynamic applications and work with API requests.
In this Python flask tutorial, you will learn everything you should know about Python flask, such as installing flask, flask render_template, etc.
The web frameworks or web application frameworks are the software framework designed to support the development of web applications, including web services, web resources, and web APIs.
Some of the most popular web frameworks are React.js, Angular, Tornado, PYRAMID, DJANGO, and one of the best Python flask.
There is a difference between web frameworks and library. Library is a set of resuable functions that you call and in contrast frameworks contains code which aids in programming rather you calling it.
What is Python Flask
Python Web frameworks contain a collection of packages or modules that allow developers to write Web applications or services easily in Python code.
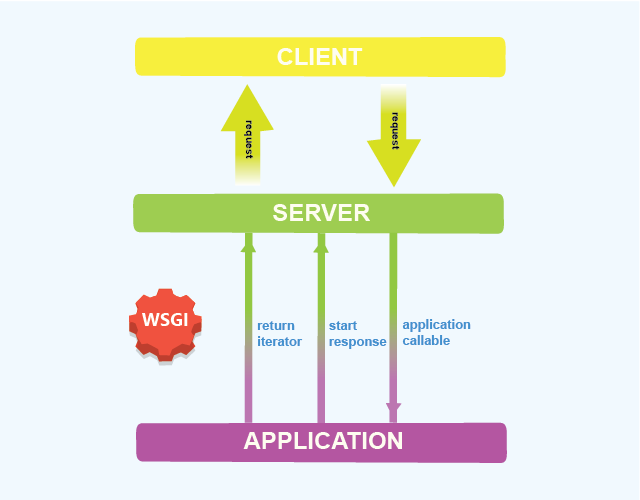
To run the application in the Python Flask framework, First, you need to import the Flask class. An instance of this class will be our WSGI application. While Python flask is lightweight and easy to use but Flask’s built-in server is not suitable for production as it doesn’t scale well.
WSGI stands for “Web Server Gateway Interface,” which is used to forward requests from a web server (such as Apache or NGINX) to a backend Python web application or framework. Responses are then passed back to the webserver to reply to the requestor.
WSGI container is altogether a separate running process that runs on a different port than your web server, and your web server is configured to pass requests to the WSGI container which runs your web application, then pass the response (in the form of HTML) back to the requester on the browser.
A web server’s configuration specifies what requests should be passed to the WSGI server to process. Once a request is processed and generated by the WSGI server, the response is passed back through the web server and the browser.
WSGI working
Why do we need Virtual Environment for Python?
When we create projects for Python, you are dependent on several libraries and dependencies, so to work on a particular project with specific versions of libraries and packages, it is recommended and a better approach to have a separate virtual environment else applications with the same libraries and version it may be breaking the functionalities.
Prerequisites
This post will be a step-by-step tutorial. If you’d like to follow along, ensure you have the following in place:
A windows 10 plus machine.
Python v3.6 or later – This tutorial will be using Python v3.9.2 on a Windows 10 machine. If you don’t have Python installed, install it from here.
Installing Python Virtual Enviornment and Python Flask on Windows
Now, you just learned about Python Flask that is it is a web framework for Python. Next, let’s kick off this tutorial by installing and setting Python Flask on your machine; our work with it uses some basic code and programs. Let’s begin!
Before you write your first python flask application make sure you have virtual environment installed and created on your system.
Python 3 comes with a virtual environment module called venv preinstalled so we will skip this step.
Now, install the virtual enviornment using the below command. They essentially allow you to create a “virtual” isolated Python installation and install packages into that virtual installation
py -m pip install --user virtualenv
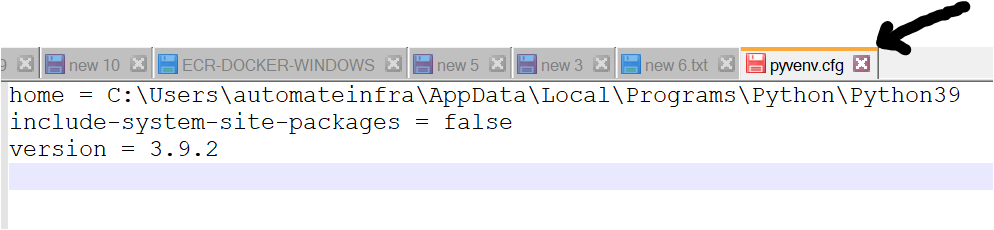
Next, you need to use the venv module command to create a virtual environment. The name of the virtual enviornment is virt. This command will also create the directory with the same name(virt), a file inside it named pyvenv.cfg and a script folder containing Python binaries as shown below.
To create a virtual environment, go to your project’s directory and run venv. If you are using Python 2, replace venv with virtualenv in the below commands.
py -3 -m venv virt # virt is the location to create the virtual environment
creating a virtual environment
Generated pyvenv.cfg with virtual environment command
Before you can start installing or using packages in your virtual environment, you’ll need to activate it. Activating a virtual environment will put the virtual environment-specific python and pip executables into your shell’s PATH
activating the virtual environment
To activate the virtual enviornment in ubuntu or Linux machine use (source virt/bin/activate) command.
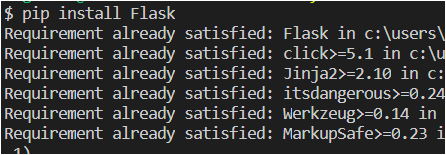
Finally, install a Python flask on your machine by running the following command. After executing the command below, distributions and dependencies are installed automatically when installing Flask.
Werkzeug implements WSGI, the standard Python interface between applications and servers.
Jinja is a template language that renders the pages your application serves.
MarkupSafe comes with Jinja. It escapes untrusted input when rendering templates to avoid injection attacks.
pip install flask # Install Flask from pip
Installing Python flask
URL binding, URL redirection with flask url_for in Python Flask
Now that you have a Python flask installed on your machine and setup, it is not useful unless you use it. Eager to get started? This section gives a good introduction to flask application.
In the python flask program, let’s learn how to work with URL binding, URL redirection, and debug mode.
Open your favorite code editor such as visual studio, and create a folder named Flask and create a file flask_prog.py inside it and copy-paste the below code.
app = Flask(__name__) : An instance or object of the class will be our WSGI application and acts as a central registry for the view functions, the URL rules, template configuration, and much more.__name__ is a convenient shortcut for this that is appropriate for most cases. This is needed so that Flask knows where to look for resources such as templates and static files.
app.route(rule, options)
The rule parameter represents URL binding with the function.
The options list parameters to be forwarded to the underlying Rule object.
app.run(host, port, debug, options)
Host : (Default) 127.0.0.1 (localhost). Set to ‘0.0.0.0’ to have server available externally.
port: Defaults to 5000; you can set it to 5001, 5002, etc.
Debug Defaults to false. If set to true, it provides debug information.
options: To be forwarded to the underlying server.
# CREATE A FLASK APPLICATION
from flask import Flask, url_for # Importing the class flask
from markupsafe import escape
# Creating Flask class object/instance named app, The first argument is name of application’s module or package. It will also work with __name__
# app = Flask(__name__.split('.')[0]) # This is a comment to show how to add a argument name
app = Flask(__name__)
# route() tell Flask what URL should trigger our function.
# route() decorator to tell Flask what URL should trigger our function
@app.route('/home')
def home():
return "This is my First Flask Website but Actually, I own Automateinfra.com"
@app.route('/login')
def login():
return "This is my login page"
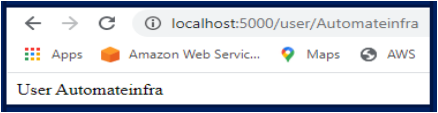
@app.route('/user/<username>') # Function receives <variable_name> as a keyword argument
def profile(username):
return 'User %s' % escape(username)
@app.route('/post/<int:post_id>')
def post_id(post_id):
return 'Post %d' % post_id
# To build a URL to a specific function, use the url_for() function.
with app.test_request_context():
print(url_for('home'))
print(url_for('login'))
print(url_for('profile', username = 'Automate Infra'))
print(url_for('post_id', post_id = '100'))
if __name__ =='__main__':
app.run(debug=True)
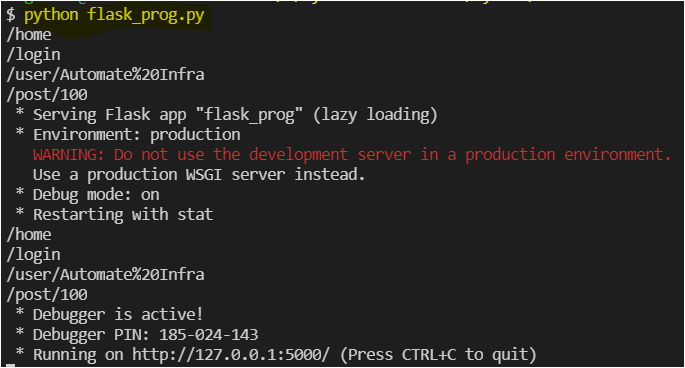
Now execute the flask program by running the following command on the visual studio terminal.
python flask_prog.py
Executing the flask python program
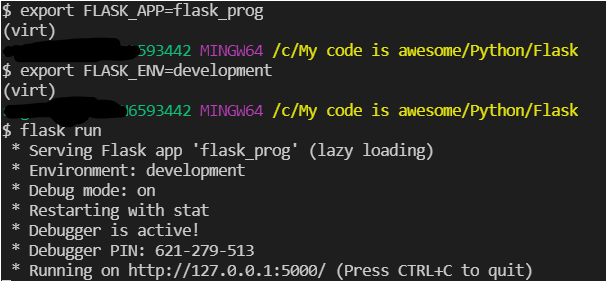
To ignore the WARNING: This is a development server. Do not use it in a production deployment. Use a production WSGI server instead.
export FLASK_APP=flask_prog
export FLASK_ENV=development
flask run
Running Python application
To verify the application working, navigate to the browser and hit 127.0.0.1:5000/login or 127.0.0.1:5000/user/<any-username>
Checking flask app
Checking the user login screen
Rendering templates or html page using flask render_template
One of the coolest features of Python is to use of templates. Templates are files containing static data and placeholders for dynamic data. A template is rendered with specific data to produce a final document. Flask uses the Jinja template library to render templates. Let’s dive in.
Assuming you are still on code editor.
Create one folder named templates and under that, create another file hello.html and paste the below content.
THIS IS MY HTML FILE WHICH IS BEING USED IN FLASK APP BELOW

<!DOCTYPE html>

<title>Hello Welcome</title>
{% if name %}
<h1>Hello {{name}} , Welcome </h1>
{% else %}
<h1>Hello, World!</h1>
{% endif %}
Create one more file and name app.py under the Flask folder and paste the below content.
from flask import Flask
from flask import render_template
from flask import request

app = Flask(__name__)

@app.route('/hello/')
@app.route('/hello/<name>')

def hello(name=None):
    return render_template('hello.html', name=name)

if __name__ =='__main__':
   app.run(debug=True)
Now, you should have a folder structure something like the below.
the tree structure of flask application
Finally, execute the flask program by running the Python command on the visual studio terminal, as shown below.
python app.py
Running flask application and generating GET and POST requests
Navigate to the browser and open 127.0.0.1:5000/hello and 127.0.0.1:5000/hello/<name> and you should see the output below.
checking the app locally on /hello URL
checking the app locally on /hello/username URL
Rendering templates and redirecting html pageusing flask render_template
Web applications use different HTTP methods when accessing URLs. By default, a route only answers to GET requests. You can use the methods argument of the route() decorator to handle different HTTP methods.
Assuming you are still on code editor:
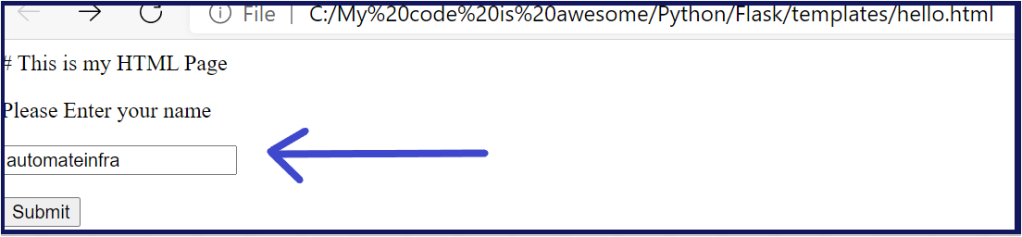
Create another file code.html and paste the below content.
# This is my HTML Page

<html>
  <body>
    <form action="http://localhost:5000/login" method="post">
      <p>Please Enter your name</p>
      <p><input type="text" name="automateinfra" /></p>
      <p><input type="submit" value="Submit" /></p>
    </form>
  </body>
</html>
Opening the HTML form
Create another file redirection.py and paste the below content.
# MY FLASK APPLICATION

from flask import Flask , redirect , url_for , request
app = Flask(__name__)

@app.route('/success/<name>')
def success(name):
    return 'welcome %s' % name

@app.route('/login', methods = ['GET','POST'])
def login():
    if request.method == 'POST':
       user = request.form['automateinfra']
       return redirect(url_for('success', name = user))
    else:
       return "INVALID"

if __name__ == '__main__':
   app.run(debug = True)
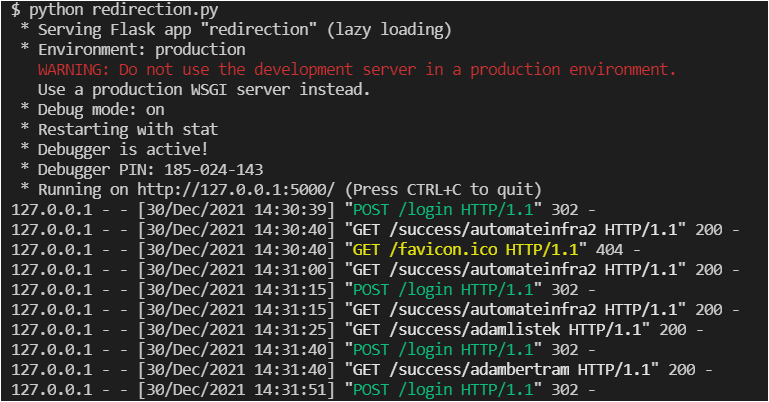
Now execute the python program by running the following command.
python redirection.py
Running the flask app.
Simultaneously run html page (code.html) in any browser and provide the name as automateinfra
Submitting the form
On browserYou will notice that when the form is submitted, it gets redirected to the Flask application and execute the success function.
Getting the same output with the specified name
flask file upload: Easy Example
You have learned how to render web pages and HTML pages by now. Now, lets us dive into the file uploading site and learn how to upload the file within a specific folder and display a file to the user. Are you interested in seeing an example of a flask file upload? If yes? Let’s dive in.
Create a file upload.html and paste the below content.
<html>
   <body>
      <form action = "http://localhost:5000/success" method = "POST"
         enctype = "multipart/form-data">
         <input type = "file" name = "file" />
         <input type = "submit"/>
      </form>
   </body>
</html>
Create another file upload_flask.py and paste the below content.
from flask import *
app = Flask(__name__)

@app.route('/upload')
def upload():
    return render_template('upload.html')

@app.route('/success', methods = ['POST'])
def success():
    if request.method == 'POST':
        f = request.files['file']
        f.save(f.filename)
        return render_template('success.html', name = f.filename)

if __name__ == '__main__':
    app.run(debug = True)
Now, execute the python script using the below command
python upload_flask.py
Executing the flask application to upload the file
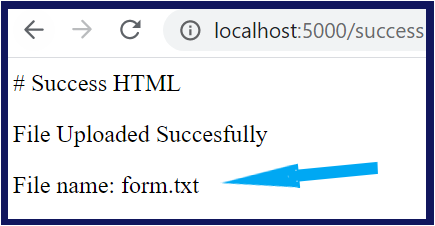
Now, open your browser and navigate to http://localhost:5000/upload and upload a file ( In my case, its form.txt).
Uploading the file in HTML form
Now click on Submit.
File uploaded successfully
Join 64 other subscribers
Conclusion
This tutorial taught you what Python flask is and how to install a flask on your windows machine.
Also, you learned how to work with Python flask, such as URL binding, URL redirection and debug mode, Rendering Templates, and redirecting html page and file uploading.
So which applications are you launching next on the Python flask web framework?
In the DevOps world, you are continually parsing, searching, and changing the text and json files; why not automate them as Python read json files efficiently. Reading the Json and text file with Python is fun.
In this tutorial, you will learn how Python read json files and read text files with python with a few lines of code.
Python v3.6 or later installed on your local machine. This tutorial will be using Python v3.9.2 on a Windows 10 machine.
A code editor. Even though you can use any text editor to work with Python files. This tutorial will be using Visual Studio (VS) Code.
Read text file and Write to text file using Pathlib python
Let’s kick off this tutorial by reading and writing the text in a text file using Python. There are tons of times when you need to read the specific text from a file or the complete file, and nothing could be better than using the Pathlib python module.
Python’s standard library is very extensive, offering a wide range of facilities. The library contains built-in modules (written in C) that provide access to system functionality such as file I/O that would otherwise be inaccessible to Python programmers, as well as modules written in Python that provide standardized solutions for many problems that occur in everyday programming.
Modules are simply files containing Python functions that can be imported inside another Python Program. In simple terms, module is similar to code library or a file that contains a set of functions that you want to include in your application.
Pathlib python module offers classes representing filesystem paths with semantics appropriate for different operating systems.
Enough theory! Let’s learn how to use the Pathlib Python module practically.
Create a Python folder in any location on your Windows machine and import the folder into the visual studio code.
Open your favorite code editor such as visual studio code, and open the Python folder in the visual studio that you created in the previous step.
Create a file named text.txt under the Python folder and add a text in it as “Hello, I am Tech Blogger.”
Create another file named pathlib_module.py Copy/paste the following Python script into the file and save it.
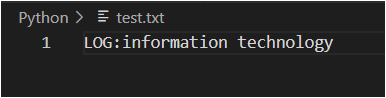
The code snippet below uses the pathlib module to open a test.txt file from a defined path, reads the content using path.read_text() function, and stores the content in the variable named cont. Also, path.write_text() the function appends the text (LOG: information technology) in the same test.txt file.
The Path.write_text() the function opens a text file in text mode, writes to text file the data and closes the file. Lastly using print() function, it prints the value of both cont and cont1.
import pathlib # Pathlib is one of the standard library of Python

# The pprint module is used to  “pretty-print” Python code which can be further used as input to the interpreter

from pprint import pprint
path = pathlib.Path("test.txt")
cont = path.read_text()
cont1 = path.write_text("LOG:information technology")
print(cont)

# cont1 provides the number of indexes used in the text "LOG:information technology"

print(cont1)
Now, execute the program using the Python command you should see the output below. After the python code is executed, you will notice that it will read the content from file text.txt and then print it. Also, the write method overrides the content into the file and then prints the number of index of the content in the file, which is 26 [LOG: information technology]
Running the python program pathlib_module
Also, you should see the content in the file has been overridden from Hello I am Tech Blogger to LOG: information technology.
The output of the python program pathlib_module
Read text file python and Write to text file python Using open() python function.
In the previous section, you learned the first way to read and write text in text files using the pathlib python module, but there are many ways to do that, and one of the other great ways is by using the open() function. Let’s jump into it and learn.
With the open() python function, you open the text file to perform operations such as read, append data, close the file, etc.
Create another file named open_function.py and Copy/paste the following Python script into the file and save it.
As soon as the file is opened, the below code reads the file using read() function and stores the values in the variable named content. Further, it prints the content and the length of the file’s content using print() the function and closes the file.
myfile = open('test.txt')
content = myfile.read()
print(content)
print(len(content))
myfile.close()   # Always close your file so that it doesnt consume memory
Executing open_function.py
Let’s check out another example where mode is defined as r and w which allows you to read the content and write to append the data in the file.
The Difference between w and a mode is w overwrites the data in file and a appends the data in the file. Also, If you intend to open any binary file such as pdf use the mode as rb or wb which denotes read or write binary.
Create another file named open_function2.py and Copy/paste the following Python script into the file and save it.
The code below opens a file, reads the content using read() the function, and prints the content. Further, write the content in the file “Adding new line” using write() the function.
with open("test.txt",mode="r") as mynewfile:
    contents2 = mynewfile.read()
    print(contents2)

with open("test.txt",mode="w") as mynewfile:
    contents1 = mynewfile.write("Adding new Line")
Executing open_function2.py
How Python read json file and Python write json to file
You have learned how to work with text files with various methods in Python, but at times, you need to work with JSON files as well, and python continues to be great for working with JSON files. In this section, let’s learn how Python read json file and Python write json to files with two functions json.load() and json.dump().
JSON module helps to work with JSON files such as reading a JSON file, writing data in JSON file or appending the file, etc. json.load() the function is used to open a JSON file. json.dump() the function will add data into the JSON file.
Create another file named file.json, and Copy/paste the following text into the file and save it.
{
 "automate": 1,
 "infra": 2
}
Create another file named json_code.py, copy/paste the following Python script into the file and save it.
The below code will perform the below steps in different parts as described below:
Opens and reads a JSON file using json.load() described in part 1
Updates the file but only in outputs, not in actual memory described in part 2
Finally updates the file in outputs and actual memory using json.dump() described in part 3.
import json
from pprint import pprint

# Part 1: Opening and Reading a JSON file using json.load()

with open('file.json', 'r') as opened_file: # Opens a Json File
    policy = json.load(opened_file)
    pprint(policy)

# Part 2: Updating the file but only in outputs not in actual memory

policy['c'] = '3'
pprint(policy)

# Part 3: Updating the file in outputs as well in actual memory using json.dump()

with open('file.json', 'w') as opened_file1:
    policy2 = json.dump(policy, opened_file1)
pprint(policy2)


with open('file.json', 'r') as opened_file2: # Opens a Json File
    policy3 = json.load(opened_file2)
    pprint(policy3)
Output of json_code.py
Join 64 other subscribers
Conclusion
In this tutorial, you learned how to read write text within text files and JSON files. Automating with Python simplifies the tasks with few lines of code and keeps you away from silly manual errors.
With that now, you have sound knowledge of reading and writing to text files in python, so what do you plan next to read json files or text files with python?