If you want to scale instances, align a load balancer in front of them, host a website, and store all data in the database. Nothing could be better than Amazon Elastic beanstalk, which provides a common platform.
With Elastic Beanstalk, you can quickly deploy and manage applications in the AWS Cloud without having to worry about the infrastructure that runs those applications.
In this tutorial, we will learn how to step up Amazon Elastic beanstalk using Terraform on AWS step by step and then upload the code to run one of the simple applications.
Let’s get started.
Table of Content
- What is AWS Elastic beanstalk?
- Prerequisites
- Building Terraform configuration files for AWS Elastic beanstalk
- Deploying Terraform configuration to Launch AWS Elastic beanstalk
- Verifying AWS Elastic beanstalk in AWS Cloud.
- Conclusion
What is AWS Elastic beanstalk?
AWS Elastic Beanstalk is one of the most widely used Amazon web service tool services. It is a service that provides a platform for various languages such as python, go ruby, java, .net, PHP for hosting the application.
The only thing you need to do in elastic beanstalk is upload code, and the rest of the things such as scaling, load balancing, monitoring will be taken care of by elastic beanstalk itself.
Elastic beanstalk makes the life of developer and cloud admins or sysadmins so easy compared to setting each service individually and interlinking each other. Some of the key benefits of AWS Elastic beanstalk are:
- It scales the applications up or down as per the required traffic.
- As infrastructure is managed and taken care of by AWS Elastic beanstalk developers working with admins don’t need to spend much time.
- It is fast and easy to setup
- You can interlink with lots of other AWS services of your own choice or you can skip it such as linking of application or classic or network load balancer.
Prerequisites
- Ubuntu machine to run terraform preferably 18.04 version + , if you don’t have any machine you can create a ec2 instance on AWS account. Recommended to have 4GB RAM and at least 5GB of drive space.
- Ubuntu machine should have IAM role attached with AWS Elastic beanstalk creation permissions or admin rights or access key and secret key configured in AWS CLI.
- Terraform installed on the Ubuntu Machine. Refer How to Install Terraform on an Ubuntu machine.
You may incur a small charge for creating an EC2 instance on Amazon Managed Web Service.
Building Terraform configuration files for AWS Elastic beanstalk
Now that you have Terraform installed on your machine, It’s time to build Terraform configuration files for AWS Elastic beanstalk that you will use to launch AWS Elastic beanstalk on the AWS Cloud.
Assuming you are still logged in Ubuntu machine.
- Create a folder in opt directory and name it as terraform-elasticbeanstalk-demo and switch to this directory.
mkdir /opt/terraform-elasticbeanstalk-demo
cd /opt/terraform-elasticbeanstalk-demo
- Create a file named main.tf in the /opt/terraform-elasticbeanstalk-demo directory and copy/paste the below content into it. The below Terraform configuration creates the AWS elastic beanstalk application and enviornment that will be required for application to be deployed.
# Create elastic beanstalk application

resource "aws_elastic_beanstalk_application" "elasticapp" {
  name = var.elasticapp
}

# Create elastic beanstalk Environment

resource "aws_elastic_beanstalk_environment" "beanstalkappenv" {
  name                = var.beanstalkappenv
  application         = aws_elastic_beanstalk_application.elasticapp.name
  solution_stack_name = var.solution_stack_name
  tier                = var.tier

  setting {
    namespace = "aws:ec2:vpc"
    name      = "VPCId"
    value     = var.vpc_id
  }
  setting {
    namespace = "aws:autoscaling:launchconfiguration"
    name      = "IamInstanceProfile"
    value     =  "aws-elasticbeanstalk-ec2-role"
  }
  setting {
    namespace = "aws:ec2:vpc"
    name      = "AssociatePublicIpAddress"
    value     =  "True"
  }

  setting {
    namespace = "aws:ec2:vpc"
    name      = "Subnets"
    value     = join(",", var.public_subnets)
  }
  setting {
    namespace = "aws:elasticbeanstalk:environment:process:default"
    name      = "MatcherHTTPCode"
    value     = "200"
  }
  setting {
    namespace = "aws:elasticbeanstalk:environment"
    name      = "LoadBalancerType"
    value     = "application"
  }
  setting {
    namespace = "aws:autoscaling:launchconfiguration"
    name      = "InstanceType"
    value     = "t2.medium"
  }
  setting {
    namespace = "aws:ec2:vpc"
    name      = "ELBScheme"
    value     = "internet facing"
  }
  setting {
    namespace = "aws:autoscaling:asg"
    name      = "MinSize"
    value     = 1
  }
  setting {
    namespace = "aws:autoscaling:asg"
    name      = "MaxSize"
    value     = 2
  }
  setting {
    namespace = "aws:elasticbeanstalk:healthreporting:system"
    name      = "SystemType"
    value     = "enhanced"
  }

}
- Create another file named vars.tf in the /opt/terraform-elasticbeanstalk-demo directory and copy/paste the below content into it. The variable file contains all the variables that you have referred in main.tf file.
variable "elasticapp" {
  default = "myapp"
}
variable "beanstalkappenv" {
  default = "myenv"
}
variable "solution_stack_name" {
  type = string
}
variable "tier" {
  type = string
}

variable "vpc_id" {}
variable "public_subnets" {}
variable "elb_public_subnets" {}
- Create another file named provider.tf in the /opt/terraform-elasticbeanstalk-demo directory and copy/paste the below content into it. The provider.tf file will authenticate and allows Terraform to connect to AWS cloud.
provider "aws" {
  region = "us-east-2"
}
- Finally create one more file named terraform.tfvars in the /opt/terraform-elasticbeanstalk-demo directory and copy/paste the below content into it.
vpc_id              = "vpc-XXXXXXXXX"
Instance_type       = "t2.medium"
minsize             = 1
maxsize             = 2
public_subnets     = ["subnet-XXXXXXXXXX", "subnet-XXXXXXXXX"] # Service Subnet
elb_public_subnets = ["subnet-XXXXXXXXXX", "subnet-XXXXXXXXX"] # ELB Subnet
tier = "WebServer"
solution_stack_name= "64bit Amazon Linux 2 v3.2.0 running Python 3.8"
- Now use tree command on your ubuntu machine and your folder structure should look something like below.

Deploying Terraform configuration to Launch AWS Elastic beanstalk
Now that all Terraform configuration files are set up, these are not doing much unless you use Terraform commands and deploy them.
- To deploy the AWS Elastic beanstalk first thing you need to do is Initialize the terraform by running terraform init command.
terraform init
As you see below, Terraform was initialized successfully; now, it’s time to run terraform plan.

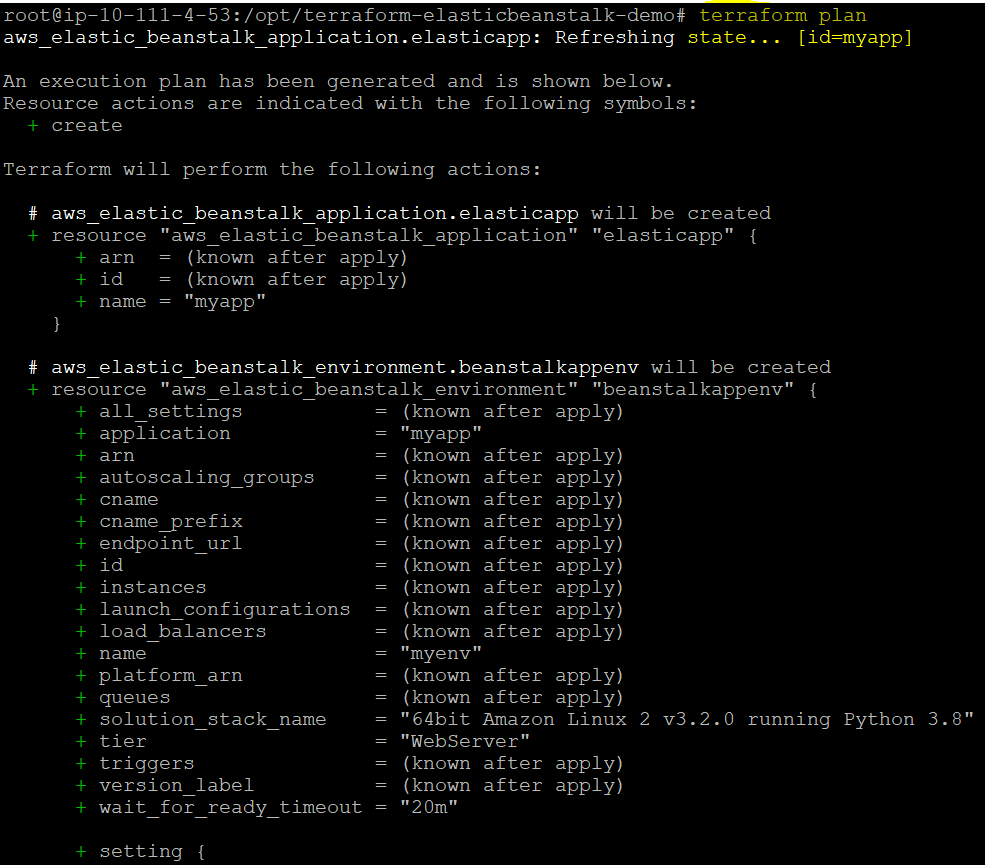
- Next run the terraform plan command. Teraform plan command provides the information regarding what all resources will be provisioned or deleted by Terraform.
terraform plan
- Finally run terraform apply command that actually deploy the code and provision the AWS Elastic terraform.
terraform apply

Verifying AWS Elastic beanstalk in AWS Cloud.
Great Job; terraform commands were executed successfully. Now it’s time to validate the AWS Elastic beanstalk launched in AWS Cloud.
- Navigate to the AWS cloud and then futher in AWS Elasticbeanstalk service. After you reach elastic beanstalk screen you will see the enviornment and applciation name that you specified in terraform.tfvar file.

- Next in AWS Elastic beanstalk service page click on the application URL and you will see something like below.

Conclusion
In this tutorial, you learned what AWS Elastic beanstalk is and how to set up Amazon Elastic beanstalk using Terraform on AWS step by step.
Now that you have AWS Elastic beanstalk launched on AWS using Terraform, which applications do you plan to deploy on it next?

Pingback: AWS DevOps Tools – Vegibit