Amazon Managed Grafana is fully managed and secure data visualization service that you can use to visualise metrics, logs and traces from multiple sources.
Amazon Managed Grafana makes it easy to deploy, operate, manages the provisioning, setup and scaling of Grafana. With Amazon Managed Grafana, you create logically isolated Grafana servers called workspaces.
- You can create Grafana dashboards and visualizations to analyze your metrics, logs, and traces without having to build, package, or deploy any hardware to run your Grafana servers.
- Amazon Managed Grafana also provides built-in security features including single sign-on, data access control, and audit reporting.
- Amazon Managed Grafana includes a permission provisioning feature for adding supported AWS services as data sources.
- You can use the Amazon Managed Grafana console to manage your workspace and gain access to Enterprise plugins such as JIRA, GitLab, New relic etc.
Authentication in Amazon Managed Grafana
Users are authenticated to use the Grafana console in an Amazon Managed Grafana workspace by single sign-on using your organization’s identity provider, instead of by using IAM.
- User credentials stored in identity providers (IdPs) that support Security Assertion Markup Language 2.0 (SAML 2.0)
- AWS IAM Identity Center
Using SAML with your Amazon Managed Grafana workspace
Rather than authenticating through IAM, SAML authentication for Amazon Managed Grafana lets you use third-party identity providers to log in, manage access control, search your data, and build visualizations.
SAML uses IDP to offer single sign on for logging into Grafana console of your Amazon Managed Grafana workspaces.
When you create an Amazon Managed Grafana workspace that uses an IdP and SAML for authorization, you must be signed on to an IAM principal that has the AWSGrafanaAccountAdministrator policy attached.

Amazon Managed Grafana supports identity providers that use the SAML 2.0 standard and have built and tested integration applications with Azure AD, CyberArk, Okta, OneLogin, and Ping Identity.

Assertion Mapping
Attribute mappings are used to map attribute types that exist in IAM Identity Center with like attributes in an AWS Managed Microsoft AD directory. IAM Identity Center retrieves user attributes from your Microsoft AD directory and maps them to IAM Identity Center user attributes.
- Convert assertion attribute names to application attribute names.ExampleAn incoming assertion attribute can be Region=US. The attribute can be converted to an outgoing application attribute ServiceLocation=US.
- You can use the Amazon Managed Grafana console to map the following SAML assertion attributes to values in Amazon Managed Grafana:
- For Assertion attribute role, specify the name of the attribute within the SAML assertion to use as the user roles.
- For Assertion attribute name, specify the name of the attribute within the SAML assertion to use for the user full “friendly” names for SAML users.
- For Assertion attribute login, specify the name of the attribute within the SAML assertion to use for the user sign-in names for SAML users.
- For Assertion attribute email, specify the name of the attribute within the SAML assertion to use for the user email names for SAML users.
Amazon Managed Grafana and Azure Active Directory Integration
Use the following steps to configure Amazon Managed Grafana to use Azure Active Directory as an identity provider.
To set up Azure Active Directory as an identity provider for Amazon Managed Grafana
- Sign in to the Azure console as an admin.
- Choose Azure Active Directory-> Enterprise Applications-> Amazon Managed Grafana SAML2.0, and select the application and choose Setup.
- In the Azure Active Directory application configuration, choose Users and groups.
- Assign the application to the users and groups that you want.
- Choose Single sign-on.
- Choose Next to get to the SAML configuration page.
- Specify your SAML settings:
- For Identifier (Entity ID), paste in your Service provider identifier URL from the Amazon Managed Grafana workspace.
- For Reply URL (Assertion Consumer Service URL), paste in your Service provider reply from the Amazon Managed Grafana workspace.
- In the User Attributes & Claims section, make sure that these attributes are mapped. They are case sensitive.
- mail is set with user.userprincipalname.
- displayName is set with user.displayname.
- Unique User Identifier is set with user.userprincipalname.
- Add any other attributes that you would to pass. For more information about the attributes that you can pass to Amazon Managed Grafana in the assertion mapping, see Assertion mapping.
- Copy the SAML Metadata URL for use in the Amazon Managed Grafana workspace configuration.
Complete the following steps in the Amazon Managed Grafana console.
To finish setting up Azure Active Directory as an identity provider for Amazon Managed Grafana
- Open the Amazon Managed Grafana console at https://console.aws.amazon.com/grafana/.
- In the navigation pane, choose the menu icon.
- Choose All workspaces.
- Choose the name of the workspace.
- In the Authentication tab, choose Setup SAML configuration.
- Under Import the metadata, choose Upload or copy/paste and paste the Azure Active Directory URL that you copied from SAML Metadata URL in the previous section.
- Under Assertion mapping, do the following:
- Set Assertion attribute role to the attribute name that you chose.
- Set Admin role values to value corresponding to your admin users’ roles.
- (Optional) If you changed the default attributes in your Azure Active Directory application, expand Additional settings – optional and then set the new attribute names.By default, the Azure displayName attribute is passed as the Name attribute and the Ping Identity mail attribute is passed to both the email and login attributes.
- Choose Save SAML Configuration.
Using AWS IAM Identity Center with your Amazon Managed Grafana workspace
Using Amazon Managed Grafana and AWS IAM Identity Center, users are redirected to their existing company directory to sign in with their existing credentials. Then, they are seamlessly signed in to their Amazon Managed Grafana workspace.
If you do not have an existing user directory or prefer not to federate, IAM Identity Center offers an integrated user directory that you can use to create users and groups for Amazon Managed Grafana.
Amazon Managed Grafana does not support the use of IAM users and roles to assign permissions within an Amazon Managed Grafana workspace. To use IAM Identity Center, you must also have AWS Organizations activated for the account.
Creating Amazon Managed Grafana workspace
In this section you will create Amazon Managed Grafana workspace and then connect to the Grafana console in that workspace.
Prerequisites
- Make sure you have authentication in place either
- User credentials stored in identity providers (IdPs), with authentication by Security Assertion Markup Language 2.0 (SAML 2.0)
- AWS IAM Identity Center:
- When you create a workspace and choose to use AWS IAM Identity Center for authentication, Amazon Managed Grafana activates IAM Identity Center in your account if you are not already using it.
- To use IAM Identity Center with Amazon Managed Grafana, you must also have AWS Organizations activated in your account.
- To create a workspace that uses an IdP and SAML for authorization, you must be signed on to an IAM principal that has the AWSGrafanaAccountAdministrator policy attached.
- To create your first workspace that uses AWS IAM Identity Center for authorization, you must be signed on to an IAM principal that has at least the following policies attached:
- AWSGrafanaAccountAdministrator
- AWSSSOMemberAccountAdministrator
- AWSSSODirectoryAdministrator
Choose Sign in with AWS IAM Identity Center, and enter the email address and password of the user that you created earlier in this procedure. These credentials only work if you have responded to the email from Amazon Managed Grafana that prompted you to create a password for IAM Identity Center.You are now in your Grafana workspace, or logical Grafana server. You can start adding data sources to query, visualize, and analyze data. For more information, see Working in your Grafana workspace.
Create your first workspace
- Open the Amazon Managed Grafana console Choose Create workspace-> Workspace name and Workspace version.

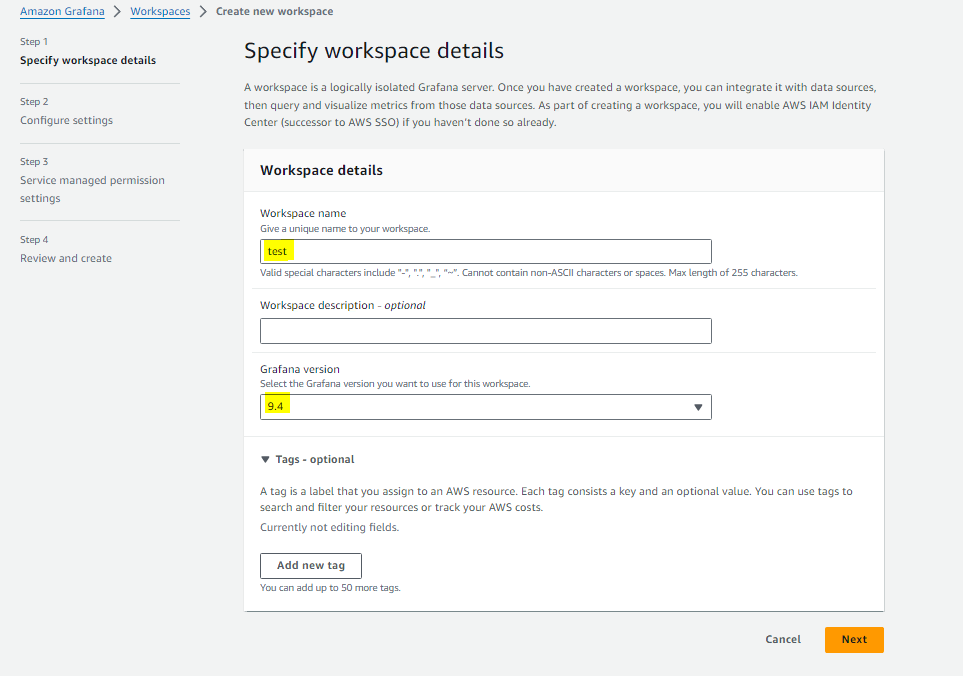
- For Authentication access, select AWS IAM Identity Center , Security Assertion Markup Language (SAML), or both.
- AWS IAM Identity Center— IAM Identity Center handles user management for access to Amazon Managed Grafana workspaces. Choose Create user, email address for password reset.
- SAML— If you select SAML, you complete the SAML setup after the workspace is created.
- Choose Next.
- Choose Service managed is selected for Permission type.

- Next, in IAM permission access settings choose Current account.
- Select the data sources that you want to query in this workspace.

- Next select Amazon SNS. This enables Amazon Managed Grafana to create an IAM policy to publish to the Amazon SNS topics in your account with
TopicNamevalues that start withgrafana. - Choose Next.

In the workspace details page, choose the URL displayed under Grafana workspace URL.
Managing user and group access to Amazon Managed Grafana
You access Amazon Managed Grafana with users that are set up in your Identity provider (IdP) or AWS IAM Identity Center. You must give those users (or groups that they belong to) permissions to the workspace. You can give them User, Editor, or Admin permissions.
To grant a user or a user group access to Amazon Managed Grafana workspaces, the user or group must first be provisioned in an Identity provider (IdP) or in AWS IAM Identity Center.
To manage user access to a Grafana workspace using the Amazon Managed Grafana console
- Open the Amazon Managed Grafana console at https://console.aws.amazon.com/grafana/.
- In the left navigation pane, choose the menu icon.
- Choose All workspaces.
- Choose the name of the workspace that you want to manage.
- Choose the Authentication tab.
- If you are using IAM Identity Center in this workspace, choose Configure users and user groups and do one or more of the following:
- To give a user access to the Amazon Managed Grafana workspace, select the check box next to the user, and choose Assign user or Make admin or choose Unassign user.
- To add groups of users such as an LDAP group, choose the Assigned user groups tab. Then, do one of the following:
- To give all members of a group access to the Amazon Managed Grafana workspace, select the check box next to the group, and choose Assign group.
- To give all members of a group the
Adminrole in the workspace, choose Make admin. - To remove workspace access for all members of a group, choose Unassign group.
- If you are using SAML in this workspace, choose SAML configuration and do one or more of the following:
- For Import method, do one of the following:
- Choose URL and enter the URL of the IdP metadata.
- Choose Upload or copy/paste. If you are uploading the metadata, choose Choose file and select the metadata file. Or, if you are using copy and paste, copy the metadata into Import the metadata.
- For Assertion attribute role, enter the name of the SAML assertion attribute from which to extract role information.
- For Admin role values, either enter the user roles from your IdP who should all be granted the
Adminrole in the Amazon Managed Grafana workspace.
- For Import method, do one of the following:
Managing network access to your workspace
You can control how users and hosts access your Grafana workspaces. You can control traffic to your workspace in two ways.
- IP Addresses (prefix lists) – You can create a managed prefix list with IP ranges that are allowed to access workspaces.
- VPC endpoints – You can create a list of VPC endpoints to your workspaces that are allowed to access a specific workspace.

To connect to a VPC from an existing Amazon Managed Grafana workspace
To connect to VPC from Grafana workspace, make sure you have AWS managed policy, AWSGrafanaAccountAdministrator. You must have a VPC setup in your account with at least two Availability Zones configured
- Open the Amazon Managed Grafana console.
- In the left navigation pane, choose All workspaces.
- Select the name of the workspace that you want to add a VPC data source connection.
- In the Network access settings tab, next to Outbound VPC connection, choose Edit to create your VPC connection.
- Choose the VPC you want to connect.
- Under Mappings, select the Availability Zones you want to use. You must choose at least two.
- Select at least one private subnet in each Availability Zone. The subnets must support IPv4.
- Select at least one Security group for your VPC. You can specify up to 5 security groups. Alternately, you can create a security group to apply to this connection.
- Choose Save changes to complete the setup.
When you configure the connection to Amazon VPC, it creates an IAM role. With this role, Amazon Managed Grafana can create connections to the VPC. The IAM role uses the service-linked role policy, AmazonGrafanaServiceLinkedRolePolicy.
Working with Grafana workspace
In an AWS account with an Amazon Managed Grafana workspace, you can specify other organizational units to make their AWS data sources available for viewing in the primary account.
If you create a workspace in a member account and you want that workspace to access resources from other AWS accounts in your organization, you must use customer managed permissions in the workspace.
In standalone account Amazon Managed Grafana automatically enables IAM Identity Center & organizations if you have AWSGrafanaAccountAdministrator , AWSSSOMemberAccountAdministrator, and AWSSSODirectoryAdministrator policies.
To connect to your Grafana Workspace console
- Open the Amazon Managed Grafana console at https://console.aws.amazon.com/grafana/.
- In the upper left corner of the page, choose the menu icon and then choose All workspaces.
- Choose the name of the workspace.
- In the workspace details page, choose the URL displayed under Grafana workspace URL.
- Choosing the workspace URL takes you to the landing page for the Grafana workspace console. Choose Sign in with AWS IAM Identity Center, and enter the email address and password.
Managing Users in Grafana Workspace.
In Amazon Managed Grafana, you don’t add users in the Grafana workspace. Instead, you use IAM Identity Center to grant users access to Amazon Managed Grafana workspaces.
User assignment and user access management from the Grafana workspace is not supported in Amazon Managed Grafana.
- If your workspace uses IAM Identity Center for authentication, you can use Amazon Managed Grafana console or APIs to assign roles. For more information, see Managing user and group access to Amazon Managed Grafana.
- Amazon Managed Grafana uses three types of permissions:
- Permissions granted as a Grafana admin
- Permissions associated with your membership on a team
- Permissions granted to a specific folder or dashboard
- If your workspace uses SAML for authentication, user roles are defined only by assertion attributes. For more information, see Assertion mapping.
AWSGrafanaAccountAdministrator Policy
When do you use AWSGrafanaAccountAdministrator
- To create a workspace that uses an IdP and SAML for authorization, you must be signed on to an IAM principal that has the AWSGrafanaAccountAdministrator policy attached.
- To create your first workspace that uses AWS IAM Identity Center for authorization, you must be signed on to an IAM principal that has at least the following policies attached:
- AWSGrafanaAccountAdministrator
- AWSSSOMemberAccountAdministrator
- AWSSSODirectoryAdministrator
{
    "Version": "2012-10-17",
    "Statement": [
        {
            "Sid": "AWSGrafanaOrganizationAdmin",
            "Effect": "Allow",
            "Action": [
                "iam:ListRoles"
            ],
            "Resource": "*"
        },
        {
            "Sid": "GrafanaIAMGetRolePermission",
            "Effect": "Allow",
            "Action": "iam:GetRole",
            "Resource": "arn:aws:iam::*:role/*"
        },
        {
            "Sid": "AWSGrafanaPermissions",
            "Effect": "Allow",
            "Action": [
                "grafana:*"
            ],
            "Resource": "*"
        },
        {
            "Sid": "GrafanaIAMPassRolePermission",
            "Effect": "Allow",
            "Action": "iam:PassRole",
            "Resource": "arn:aws:iam::*:role/*",
            "Condition": {
                "StringLike": {
                    "iam:PassedToService": "grafana.amazonaws.com"
                }
            }
        }
    ]
}
AmazonGrafanaRedshiftAccess
AmazonGrafanaRedshiftAccess policy allows a user or an IAM role to use the Amazon Redshift data source plugin in Grafana.
{
  "Version": "2012-10-17",
  "Statement": [
    {
      "Effect": "Allow",
      "Action": [
        "redshift:DescribeClusters",
        "redshift-data:GetStatementResult",
        "redshift-data:DescribeStatement",
        "secretsmanager:ListSecrets"
      ],
      "Resource": "*"
    },
    {
      "Effect": "Allow",
      "Action": [
        "redshift-data:DescribeTable",
        "redshift-data:ExecuteStatement",
        "redshift-data:ListTables",
        "redshift-data:ListSchemas"
      ],
      "Resource": "*",
      "Condition": {
        "Null": {
          "aws:ResourceTag/GrafanaDataSource": "false"
        }
      }
    },
    {
      "Effect": "Allow",
      "Action": "redshift:GetClusterCredentials",
      "Resource": [
        "arn:aws:redshift:*:*:dbname:*/*",
        "arn:aws:redshift:*:*:dbuser:*/redshift_data_api_user"
      ]
    },
    {
      "Effect": "Allow",
      "Action": [
        "secretsmanager:GetSecretValue"
      ],
      "Resource": "*",
      "Condition": {
        "Null": {
          "secretsmanager:ResourceTag/RedshiftQueryOwner": "false"
        }
      }
    }
  ]
}
AmazonGrafanaCloudWatchAccess
This policy grants access to Amazon CloudWatch and the dependencies needed to use CloudWatch as a datasource within Amazon Managed Grafana.
{
  "Version": "2012-10-17",
  "Statement": [
    {
      "Effect": "Allow",
      "Action": [
        "cloudwatch:DescribeAlarmsForMetric",
        "cloudwatch:DescribeAlarmHistory",
        "cloudwatch:DescribeAlarms",
        "cloudwatch:ListMetrics",
        "cloudwatch:GetMetricStatistics",
        "cloudwatch:GetMetricData",
        "cloudwatch:GetInsightRuleReport"
      ],
      "Resource": "*"
    },
    {
      "Effect": "Allow",
      "Action": [
        "logs:DescribeLogGroups",
        "logs:GetLogGroupFields",
        "logs:StartQuery",
        "logs:StopQuery",
        "logs:GetQueryResults",
        "logs:GetLogEvents"
      ],
      "Resource": "*"
    },
    {
      "Effect": "Allow",
      "Action": [
        "ec2:DescribeTags",
        "ec2:DescribeInstances",
        "ec2:DescribeRegions"
      ],
      "Resource": "*"
    },
    {
      "Effect": "Allow",
      "Action": "tag:GetResources",
      "Resource": "*"
    },
  ]
}
Service-linked role permissions for Amazon Managed Grafana
Amazon Managed Grafana uses the service-linked role named AmazonManagedGrafana – Amazon Managed Grafana uses this role to create and configure resources, such as ENIs or Secrets Manager secrets, within customer accounts. The AmazonManagedGrafana service-linked role trusts the following services to assume the role:
grafana.amazonaws.com
{
  "Version": "2012-10-17",
  "Statement": [
    {
      "Effect": "Allow",
      "Principal": {
        "Service": "grafana.amazonaws.com"
      },
      "Action": "sts:AssumeRole"
    }
  ]
}
AmazonGrafanaServiceLinkedRolePolicy is the service role linked policy.
Amazon Managed Grafana permissions
The following table displays possible Amazon Managed Grafana actions and their required permissions:
| Action | Required permission |
|---|---|
| Create an Amazon Managed Grafana workspace. A workspace is a logically isolated Grafana server used to create and visualize metrics, logs, and traces. | grafana:CreateWorkspace |
| Delete an Amazon Managed Grafana workspace. | grafana:DeleteWorkspace |
| Retrieve detailed information about an Amazon Managed Grafana workspace. | grafana:DescribeWorkspace |
| Retrieve the authentication configuration associated with a workspace. | grafana:DescribeWorkspaceAuthentication |
| Retrieve a list of permissions associated with workspace users and groups. | grafana:ListPermissions |
| Retrieve a list of the Amazon Managed Grafana workspaces that exist in the account. | grafana:ListWorkspaces |
| Update the permissions associated with workspace users and groups. | grafana:UpdatePermissions |
| Update Amazon Managed Grafana workspaces. | grafana:UpdateWorkspace |
| Update the authentication configuration associated with a workspace. | grafana:UpdateWorkspaceAuthentication |
| Associate a Grafana enterprise license with a workspace. | grafana:AssociateLicense |
Conclusion
In this article you read everything you need to know about AWS Managed Grafana?
