In the previous Kubernetes Tutorial for Kubernetes Certification [PART-1], you got a jump start into the Kubernetes world; why not gain a more advanced level of knowledge of Kubernetes that you need to become a Kubernetes pro.
In this Kubernetes Tutorial for Kubernetes Certification [PART-2] guide, you will learn more advanced levels of Kubernetes concepts such as Kubernetes deployment, kubernetes volumes, Kubernetes ReplicaSets, and many more.
Without further delay, let’s get into it.
Table of Content
- kubernetes deployment
- Kubernetes ReplicaSets
- Kubernetes DaemonSet
- Kubernetes Jobs
- What is a kubernetes service
- Kubernetes ClusterIP
- Kubernetes NodePort
- kubernetes loadbalancer service
- Kubernetes Ingress
- kubernetes configmap or k8s configmap
- Kubernetes Secrets
- Kubernetes Volume and kubernetes volume mounts
- kubernetes stateful sets
- Conclusion
Introduction to YAML
YAML format is easier to understand and to see three different types of syntax, lets checkout below.
The below is the XML syntax.
<servers>
      <server>
               <name>server1</name>
               <owner>sagar</owner>
               <status>active</status>
     <server>
<servers>
The below is the JSON syntax.
{
         Servers: [
      {
        name: server1,
        owner: sagar,
        status: active,
     }
   ]
}
The below is the YAML syntax.
servers:
      -name: server1
      -owner: sagar
       -status: active
The below is again an example of the YAML syntax.
Fruits:
  - Apple:
        Calories: 95
        Fat: 0.3
        Carbs: 25
  - Banana:
      Calories: 105
      Fat: 0.4
      Carbs: 27
  - Orange:
        Calories: 45
        Fat: 0.1
        Carbs: 11
Vegetables:
  - Carrot:
        Calories: 25
        Fat: 0.1
        Carbs: 6
  - Tomato:
        Calories: 22
        Fat: 0.2
        Carbs: 4.8
  - Cucumber:
        Calories: 8
        Fat: 0.1
        Carbs: 1.9
kubernetes deployment
Kubernetes deployments allow you to create Kubernetes Pods and containers using YAML files. Using Kubernetes deployment, you specify the number of pods or replica sets you need for a particular Kubernetes deployment.
Unlike kubernetes replicaset, Kubernetes deployment allows you to roll back, update the rollouts, resume or pause the deployment and never cause downtime. When you create a Kubernetes deployment by defining the replicas the kubernetes replicaset are also created.
A ReplicaSet ensures that a specified number of Pods are running simultaneously; however, a Kubernetes deployment is a higher-level concept that manages ReplicaSets and provides declarative updates to pods along with a lot of other useful features.
Let’s check out an example to create Kubernetes deployments.
- Create a file named deployment.yaml and copy/paste the below content into the file.
- The name of the deployment is nginx-deployment defined in metadata.name field.
- The deployment will create three kubernetes Pods using the spec.replicas field.
- Kubernetes pods characterstics ae defined using the spec.selector field.
- Pods will be launched if matches deployment Label defined using spec.selector.matchlabels.app
- Pods are labeled using spec.template.metadata.labels.app
- Containers specifications are done using spec.template.spec respectively.
When you execute the kubectl apply command to create the kubernetes object then your YAML file or requuest to Kube API server is first converted into JSON format.
The below is an example of the Pod YAML syntax.
apiVersion: apps/v1
kind: Deployment
metadata:
  name: nginx-deployment  # Name of the deployment
  labels:
     app:nginx  # Declaring the deployments labels.
spec:
  replicas: 3  # Declaring the number of Pods required
  selector:
    matchLabels:
      app: nginx # Pods will be launched if matches deployment Label.
  template:
    metadata:
      labels:
        app: nginx # Labels of the Pods.
    spec:
      containers:
      - name: nginx
        image: nginx:1.14.2
        ports:
        - containerPort: 80
- Run the commands below.
kubectl create deployment --help

kubectl create -f deployment.yml

kubectl create deployment my-dep --image=busybox --replicas=3
- Now, run kubectl get deployments to check if the Kubernetes deployment has been created.
kubectl get deployments

- Next, run kubectl get rs to check the Kubernetes ReplicaSets created by the Deployment,
kubectl get deployments
- If you wish to check the labels which are automatically generated for each Pod, run the below command.
kubectl get pods --show-labels

- To check the information of the deployment use the below command.
kubectl describe deployment nginx-deployment
- To update the deployment such as using
nginx:1.16.1instead ofnginx:1.14.2
kubectl set image deployment/nginx-deployment nginx=nginx:1.16.1 --record
- To create an NGINX Pod
kubectl run nginx --image=nginx
–dry-run=client , The will not create the resource instead tell you weather resource can be created and command is correct.
-o yaml : This will output the resource definition in YAML format on screen.
- Generate POD Manifest YAML file (-o yaml). Don’t create it(–dry-run)
kubectl run nginx --image=nginx --dry-run=client -o yaml
- To create a deployment
kubectl create deployment --image=nginx nginx
- To generate Deployment YAML file. Hint use (-o yaml) to create the deployment file and to avoid creating deployment use –dry-run
kubectl create deployment --image=nginx nginx --dry-run=client -o yaml
- To generate Deployment YAML file (-o yaml). Don’t create it(–dry-run) and save it to a file.
kubectl create deployment --image=nginx nginx --dry-run=client -o yaml > nginx-deployment.yaml
- To make necessary changes to the file (for example, adding more replicas) and then create the deployment.
kubectl create -f nginx-deployment.yaml
- The –replicas option to create a deployment with 4 replicas.
kubectl create deployment --image=nginx nginx --replicas=4 --dry-run=client -o yaml > nginx-deployment.yaml
Kubernetes Update and Rollback
- First check the numbers of pods and make sure no resource is present in this namespace.
kubectl get pods
- Next create the deployment. Record option record the changes.
kubectl create -f deployment.yml --record=true
- Next check the status of the rollout by using below command.
kubectl rollout status deployment app-deployment
- Next check the history of the deployment by using below command..
kubectl rollout history deployment app-deployment
- Next describe the deployment by using below command.
kubectl create -f deployment.yml
- Next Edit the deployment by using below command. For example change the image version.
kubectl create -f deployment.yml
- Next if any issues in the deployment then you can undo the deployment by using below command..
kubectl rollout undo deployment app-deployment
- Next check the status of the rollout by using below command.
kubectl rollout status deployment app-deployment
Imperative and Declarative Kubernetes commands
Imperative commands are those commands that are run one by one and are run when there are steps to be performed such as:
kubectl run --image=nginx nginx
kubectl create deployment --image=nginx nginx
kubectl expose deployment nginx --port 80
kubectl edit deployment nginx
kubectl scale deployment --replicas=5
kubectl set image deployment nginx nginx=nginx:1.18
kubectl create -f nginx.yaml
kubectl edit -f nginx.yaml
kubectl delete -f nginx.yaml
Note: the edit command just edits the deployment however it doesn’t change anything in the manifest file. It opens the manifest file within the kubernetes memory not the original file.
Also in case of imperative commands if you already have pods running and if you create a deployment or again run commands then it will give error from server.
In case of declarative commands the yaml manifest file is created and then you run the below command.
kubectl apply -f nginx.yaml
Kubernetes ReplicaSets
Kubernetes ReplicaSets maintains a set of Kubernetes Pods running simultaneously and makes sure the pods are load-balanced properly; however, a Kubernetes deployment is a higher-level concept that manages ReplicaSets and provides declarative updates to pods along with a lot of other useful features.
Even if you declare the replica sets as 1, kubernetes makes sure that you have this 1 pod running all the time.
Kubernetes Replicasets are deployed in the same way as Kubernetes deployments. For ReplicaSets, the kind is always a ReplicaSet, and you can scale delete the pods with the same kubectl command as you did for deployments.
apiVersion: apps/v1
kind: ReplicaSet
metadata:
  name: nginx-replicasets
  labels:
      app:nginx
spec:
  replicas: 3
  selector:
    matchLabels:   # Replicaset Label To create replicasets only when it matches label app: nginx
      app: nginx
  template:
    metadata:
     labels:      # Container label app: nginx
        app: nginx
    spec:
      containers:
      - name: nginx
        image: nginx:1.14.2
        ports:
        - containerPort: 80
- Next run the below command to create the kubernetes Replicaset.
kubectl apply -f replicasets.yml
kubectl create -f rc-definition.yml
- To replace the Kubenetes Replicaset run the below command.
kubectl replace -f replicasets.yml
- To scale the Kubernetes Replicasets run the below command.
Changing the Kubernetes Replicasets doesn’t change the number of replicas in the Kubernetes manifest file.
kubectl scale --replicas=6 -f replicasets.yml
kubectl scale --replicas=6 replicaset name-of-the-replicaset-in-metadadata

- To find the replicasets run the below command.
kubectl get replicationcontroller
- Some of the important commands of replicasets are:
kubectl create -f replicaset-definition.yml
kubectl get replicaset
kubectl delete replicaset myapp-replicaset
kubectl replcase -f replicaset-definition.yml
kubectl scale --replicas=6 -f replicaset-definition.yml
If your replicaset are running with same labels previously and you try to create new pods with same label then it will terminate the new pods by replicasets.
Kubernetes DaemonSet
Kubernetes DaemonSet ensures that each node in the Kubernetes cluster runs a copy of Pod. When any node is added to the cluster, it ensures Pods are added to that node, or when a node is removed, Pods are also removed, keeping the Kubernetes cluster clean rather than getting stored in the garbage collector.
Generally, the node that a Kubernetes Pod runs on is chosen by the Kubernetes scheduler; however, for Kubernetes, DaemonSet pods are created and scheduled by the DaemonSet controller. To deploy, replace or update the Kubernetes Daemonset, you need to use the same Kubectl command for Kubernetes deployments.
- Create a file named daemonset.yaml and copy/paste the below code.
apiVersion: apps/v1
kind: DaemonSet
metadata:
  name: fluentd-elasticsearch
  namespace: kube-system
  labels:
    k8s-app: fluentd-logging
spec:
  selector:
    matchLabels:
      name: fluentd-elasticsearch
  template:
    metadata:
      labels:
        name: fluentd-elasticsearch
    spec:
      tolerations:
      - key: node-role.kubernetes.io/master
        operator: Exists
        effect: NoSchedule
      containers:
      - name: fluentd-elasticsearch
        image: quay.io/fluentd_elasticsearch/fluentd:v2.5.2
        resources:
          limits:
            memory: 200Mi
          requests:
            cpu: 100m
            memory: 200Mi
- Now, execute the kubectl apply command to create a Kubernetes daemonset.
kubectl apply -f daemonset.yaml

Kubernetes Jobs
The main function of the Kubernetes job is to create one or more Kubernetes pods and check the successful deployment of the pods. Deleting a Kubernetes job will remove the Pods it created, and suspending a Kubernetes job will delete its active Pods until it is resumed again.
For example, while creating a new Pod, if it fails or is deleted due to a node hardware failure or a node reboot, the Kubernetes Job will provide the same. Kubernetes Job wallows you to run multiple Pods parallel or on a particular schedule.
When a Kubernetes Job completes, no more Pods are created or deleted, allowing you to still view the logs of completed pods to check for errors, warnings, etc. The Kubernetes job remains until you delete it using the kubectl delete job command.
- To create a Kubernetes Job create a file named job.yaml and copy/paste the below content into it.
apiVersion: batch/v1
kind: Job
metadata:
  name: tomcatjob
spec:                  # It is of List and a array
  template:
    # This is the pod template
    spec:
      containers:
      - name: tomcatcon
        image: Tomcat
        command: ['sh', '-c', 'echo "Hello, Tomcat!" && sleep 3600']
      restartPolicy: OnFailure
- To create the Kubernetes Jobs run the kubectl apply command followed by kubectl get job command to verify.
kubectl apply -f job.yaml

kubectl get jobs

- To list all the Pods that belong to a Kubernetes Job use kubectl get pods command as shown below.
pods=$(kubectl get pods --selector=job-name=pi --output=jsonpath='{.items[*].metadata.name}')
echo $pods

What is a kubernetes service
Kubernetes service allows you to expose applications running on a set of Pods as a network service. Every Kubernetes Pods gets a unique IP address and DNS name, and sometimes these are deleted or added to match the state of your cluster, leading to a problem as IP addresses are changed.
To solve Kubernetes service was introduced, which aligns static Permanent IP address on a set of Pods as a network service. There are different Kubernetes service types: ClusterIP, NodePort, Loadbalancer, and ExternalName.
Kubernetes ClusterIP
Kubernetes ClusterIP exposes the service on an internal IP and is reachable within the cluster only and possibly only within the cluster nodes. You cannot access the ClusterIP service outside the Kubernetes cluster. When you create a Kubernetes ClusterIP, then a virtual IP is assigned.

- Lets learn to create a ClusterIP using a file named clusterip.yaml and copy/paste the below content.
kind: Service
apiVersion: v1
metadata:
  name: backend-service
spec:
  type: ClusterIP
  selector:
    app: myapp
  ports:
    - port: 8080     # Declaring the ClusterIP service port
# target port is the pod's port and If not set then it takes the same value as the service port
      targetPort: 80
- To create the ClusterIP service run the kubectl apply command followed by kubectl get service command to verify.
kubectl apply -f clusterip.yaml

kubectl get service

- To create a Service named redis-service of type ClusterIP to expose pod redis on port 6379
kubectl expose pod redis --port=6379 --name redis-service --dry-run=client -o yaml


kubectl create service clusterip redis --tcp=6379:6379
Kubernetes NodePort
Kubernetes NodePort exposes the Kubernetes service to be accessible outside your cluster on a specific port called the NodePort. Each node proxies the NodePort (the same port number on every Node) into your Service. The Kubernetes control plane allocates a port default: 30000-32767, If you want a specific port number, you can specify a value in the nodePort field.
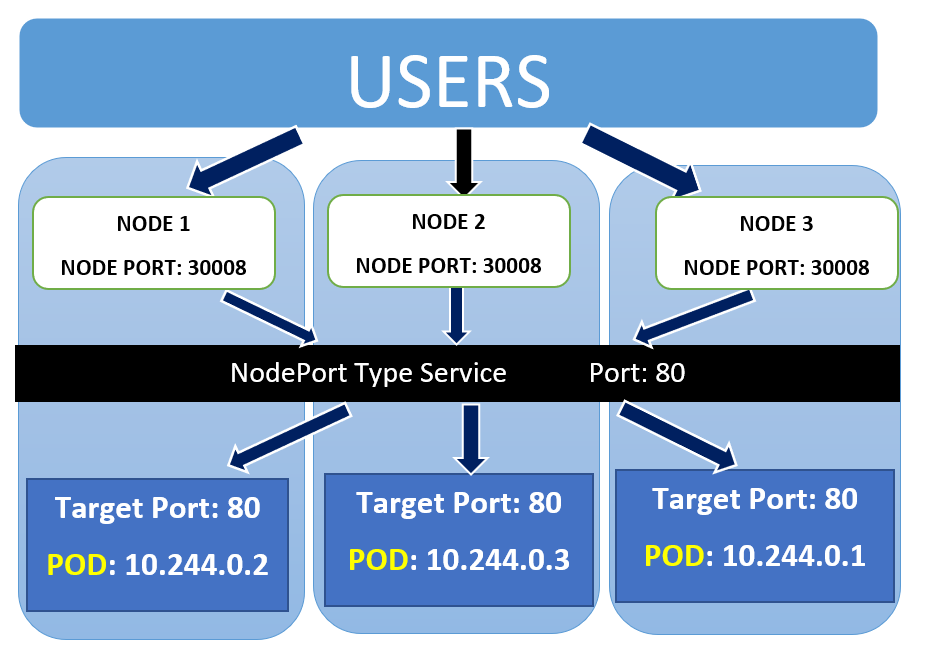
Let’s learn how to create a simple Kubernetes NodePort service. In the below nodeport.yaml manifest file:
- Kind should be set to Service as you are about to launch a new service.
- The name of the service is hostname-service.
- Expose the service on a static port on each node to access the service from it outside the cluster. When the node receives a request on the static port, 30162 then forwards the request to one of the pods with the label “app: echo-hostname”.
- Three types of ports for a service are as follows:
- nodePort – The static port assigned to each node.
- port – The service port exposed internally in the cluster.
- targetPort – Container port or pod Port on which application is hosted.
kind: Service
apiVersion: v1
metadata:
  name: hostname-service
spec:
  type: NodePort
  selector:
    app: echo-hostname
# Client access the Node Port which is forwarded to the service Port and to the target Port
  ports:
    - nodePort: 30162  # Node Port
      port: 8080 # Service Port
      targetPort: 80   # Pod Port ( If not set then it takes the same service Port)
- To create the Kubernetes NodePort service run the kubectl apply command followed by kubectl get service command to verify.
kubectl apply -f nodeport.yaml

kubectl get service

If there is a single pod on a single node or multiple pods on a single node or multiple pods on multiple nodes then NodePort remains the same but with a different URL for the client.
https://node1:30008
https://node2:30008
https://node3:30008
- To create a Service named nginx-service of type NodePort to expose pod nginx on port 80 and node port 30080. You have to generate a definition file and then add the node port in manually before creating the service with the pod.)
kubectl expose pod nginx --port=80 --type=NodePort --name nginx-service --dry-run=client -o yaml


kubectl create service nodeport nginx --tcp=80:80  --node-port=30080  --dry-run=client -o yaml
kubernetes loadbalancer service
Kubernetes load balancer service exposes the service externally using a cloud provider’s load balancer. If you access the service with NodePort, you will need to use different URLs to access and overcome this use load balancer.
- Let’s learn how to create a simple kubernetes loadbalancer service. In the below lb.yaml manifest file:
kind: Service
apiVersion: v1
metadata:
  name: loadbalancer-service
spec:
  type: LoadBalancer
  selector:
    app: echo-hostname
# Client access the Load balancer which forwards to NodePort to the targetPort.
  ports:
    - nodePort: 30163  # Node Port
      port: 8080 # Service Port
      targetPort: 80   # Pod Port ( If not set then it takes the same service Port)
- To create the kubernetes Loadbalancer service run the kubectl apply command followed by kubectl get service command to verify.
kubectl apply -f lb.yaml

kubectl get service

Kubernetes Service commands
kubectl get service

kubectl get svc

kubectl describe svc <name-of-service>
Kubernetes Ingress
Earlier in the previous section, you learned how to enable the Kubernetes load balancer or NodePort service to access the Kubernetes service from outside the cluster. But as your environment grows, you need to expose the service on a proper link, configure multiple URL redirection, apply SSL certificates, etc. To achieve this, you need to have Kubernetes Ingress.
To deploy Kubernetes Ingress, you need a Kubernetes ingress controller and Ingress resources as they are not automatically deployed within a cluster. As you can see in the below image, Ingress sends all its traffic to Kubernetes Service and further to the Pods.

Let’s learn how to create a Kubernetes Ingress resource. The name of an Ingress object must be a valid DNS subdomain name, and annotations configure the Ingress controller. The Ingress spec configures a load balancer or proxy server and the rules.
- If you don’t specify any host within the spec parameter then the rule is applied applies to all inbound HTTP traffic via IP address.
- /testpath is the path associated with backend service and port.
apiVersion: networking.k8s.io/v1
kind: Ingress
metadata:
  name: minimal-ingress
  annotations:
    nginx.ingress.kubernetes.io/rewrite-target: /
spec:
  rules:
  - http:
      paths:
      - path: /testpath
        pathType: Prefix
        backend:
          service:
            name: test
            port:
              number: 80

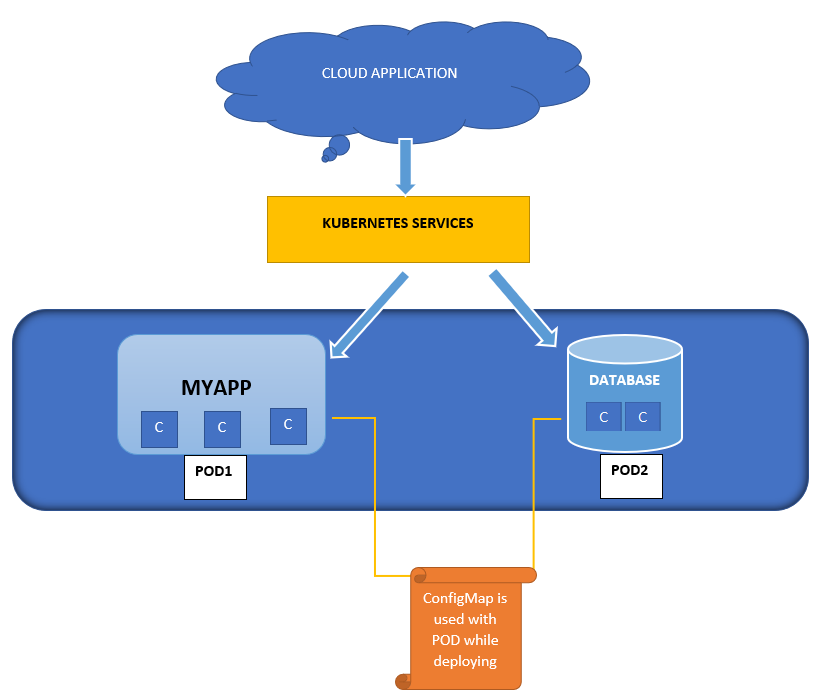
kubernetes configmap or k8s configmap
Kubernetes configmap allows you to store non-confidential data in key-value pairs such as environmental values or command-line arguments or as a configuration file in a volume such as a database subdomain name.
Kubernetes ConfigMaps does not provide secrecy or encryption. If the data you want to store are confidential, use a Secret rather than a ConfigMap.
- There are multiple waysto use kubernetes configmap to configure containers inside a Pod such as.
- By using commands in the containers.
- Environmental variable on containers.
- Attaching it in the volume.
- Write a code or script which Kubernetes API reads configmap.
- Let’s learn how to create a k8s configmap using the below manifest file.
apiVersion: v1
kind: ConfigMap
metadata:
  name: game-demo
data:
  players: "3"
  ui_properties_file_name: "user-interface.properties"
- Now that you have created Kubernetes configmap, lets use values from
game-demoKubernetes configmap to configure a Pod:
apiVersion: v1
kind: Pod
metadata:
  name: configmap-demo-pod
spec:
  containers:
    - name: demo
      image: alpine
      command: ["sleep", "3600"]
      env:
        # Define the environment variable
        - name: PLAYER
          valueFrom:
            configMapKeyRef:
              name: game-demo
              key: players
Kubernetes Secrets
Kubernetes Secrets allow you to store sensitive information such as passwords, OAuth tokens, SSH keys and enable encryption. There are three ways to use Kubernetes Secrets with POD like environmental variable on the container, attach as a file in volume and use by kubelet when you pull the image.
Let’s learn how to create Kubernetes Secrets using the below manifest file.
apiVersion: v1
kind: Secret
metadata:
  name: secret-basic-auth
type: kubernetes.io/basic-auth
stringData:
  username: admin
  password: password123
You can also create Kubernetes secrets using kubectl command.
kubectl create secret docker-registry secret-tiger-docker \
  --docker-username=user \
  --docker-password=pass \
  --docker-email=automateinfra@gmail.com
Kubernetes Volume and kubernetes volume mounts
Kubernetes volumes are used to store data for containers in Pod. If you store the data locally on a container, then it’s a risk as, and when pod or a container dies, the data is lost. Kubernetes volumes remain persistent and are backed up easily.
Kubernetes volumes can be mounted to other Kubernetes volumes. Each container in the Pod’s configuration must independently specify Kubernetes volume mounts.
- There are different persistent volumes which kubernetes supports such as:
- AWS EBS : An AWS EBS volume mounts into your pod provided your nodes on which pods are running must be AWS EC2 instances
- azure disk : The azure Disk volume type mounts a Microsoft Azure Data Disk into a pod
- Fiber channel: Allows an existing fiber channel block storage volume to mount to a Pod.
- Let’s learn how to declare Kubernetes volume using AWS EBS configuration example.
apiVersion: v1
kind: Pod
metadata:
  name: test-ebs
spec:
  containers:
  - image: k8s.gcr.io/test-webserver
    name: test-container
    volumeMounts:
    - mountPath: /test-ebs
      name: test-volume
  volumes:
  - name: test-volume
    # This AWS EBS volume must already exist.
    awsElasticBlockStore:
      volumeID: "<volume id>"
      fsType: ext4
kubernetes stateful sets
Kubernetes stateful sets manage stateful applications such as MySQL, Databases, MongoDB, which need persistent storage. Kubernetes stateful sets manage the deployment and scaling of a set of Pods and provide guarantees about the ordering and uniqueness of these Pods.
With Kubernetes stateful sets with N replicas, when Pods are being deployed, they are created sequentially, in order from {0..N-1} and are terminated in reverse order, from {N-1..0}.
Let’s check out how to declare Kubernetes stateful sets configuration example below.
apiVersion: apps/v1
kind: StatefulSet
metadata:
  name: web
spec:
  selector:
    matchLabels:
      app: nginx # has to match .spec.template.metadata.labels
  serviceName: "nginx"
  replicas: 3 # by default is 1
  template:
    metadata:
      labels:
        app: nginx # has to match .spec.selector.matchLabels
Kubectl apply command
When you need to perform the deployment then you need to run the below command using the local file.
kubectl apply -f nginx.yaml
After the apply command the same file similar to local file is created within the kubernetes and is known as Live Object configuration.
Also the local file configuration is converted into json format also known as Last applied configuration and stored within kubernetes and as annotations . The reason is it enables us to identify the difference between the last configurations and current configurations.
annotations:
     kubectl.kubernetes.io/last-applied-configuration
Conclusion
Now that you have learned everything you should know about Kubernetes, you are sure going to be the Kubernetes leader in your upcoming projects or team or organizations.
So with that, which applications do you plan to host on Kubernetes in your next adventure?

Pingback: Kubernetes Tutorial for Kubernetes Certification [PART-1] | Automateinfra
Pingback: The Ultimate Kubernetes Interview questions for Kubernetes Certification (CKA) | Automateinfra