
AWS Migration Hub (Migration Hub) provides a single place to discover your existing servers, plan migrations, and track the status of each application migration.
The Migration Hub provides visibility into your application portfolio and streamlines planning and tracking.
You can visualize the connections and the status of the servers and databases that make up each of the applications you are migrating, regardless of which migration tool you are using.

Migration Hub supports migration status updates from the following Migration tools:
- AWS Application Migration Service which is migration service migrations to AWS.
- AWS Database Migration Service (AWS DMS).

- On your first use of the AWS Migration Hub console, you’re prompted to select a Migration Hub home region where your migration tracking data will be stored.
Viewing network connections in AWS Migration Hub allows you to visualize a server’s dependencies. The visualization of these dependencies helps you verify all of the resources required to successfully migrate each of your applications to Amazon Web Services.

Table of Content
Table of Contents
- AWS Discovery Tools
- Discovering On-premises Resources Using AWS Discovery Tools
- Getting Started with Migration Evaluator
- Migrate to AWS Using Migration Hub Migration Tools and Tracking
- Track the Status of Your Migrations in Migration Hub
- IAM Policy for AWS Migration Hub
- Conclusion
AWS discovery tools
You get the data about your servers and applications into the AWS Migration Hub console by using the AWS discovery tools. To use the discovery tools.
- In the Migration Hub console navigation pane, choose Discover and then choose Tools.
- On the Discovery Tools page, you can choose to import data, download the Agentless Collector or a Discovery Agent, or you can choose to use the Migration Evaluator Collector.

Discovering on-premises resources using AWS discovery tools
You get the data about your servers and applications into the AWS Migration Hub console by using the following discovery tools.
- Application Discovery Service Agentless Collector – Agentless Collector is an on-premises application that collects information through agentless methods about your on-premises environment, including server profile information (for example, OS, number of CPUs, amount of RAM), and server utilization metrics. You install the Agentless Collector as a virtual machine (VM) in your VMware vCenter Server environment using an Open Virtualization Archive (OVA) file.
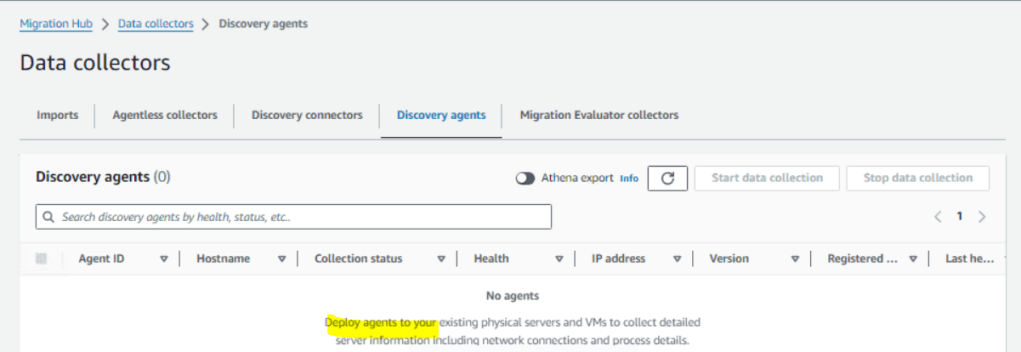
- AWS Application Discovery Agent – The Discovery Agent is AWS software that you install on your on-premises servers and VMs to capture system configuration, system performance, running processes, and details of the network connections between systems. Agents support most Linux and Windows operating systems, and you can deploy them on physical on-premises servers, Amazon EC2 instances, and virtual machines.
- Migration Evaluator Collector – Migration Evaluator is a migration assessment service that helps you create a directional business case for AWS cloud planning and migration.
- Migration Hub import – With Migration Hub import, you can import information about your on-premises servers and applications into Migration Hub, including server specifications and utilization data.
Note: The benefit of using Discovery Agent is that it provides more detailed information than using Application Discovery Service Agentless Collector(Agentless Collector). In contrast, the benefit of using Agentless Collector is that it provides a more efficient and faster on-premises infrastructure assessment.
Getting started with Agentless Collector
This section describes how to get started using Application Discovery Service Agentless Collector (Agentless Collector). The Agentless Collector is a virtual appliance that you install in your on-premises VMware environment.
- Create an IAM user for Agentless Collector
- Download the Agentless Collector: Sign in to vCenter as a VMware administrator and switch to the directory where you want to download the Agentless Collector OVA file.
- Deploy Agentless Collector
- Access the Agentless Collector console
- Configure Agentless Collector
- Set up Agentless Collector data collection modules
- View collected data: To view the data discovered by the VMware vCenter Agentless Collector data collection module. In the Migration Hub console navigation pane, under Discover, choose Servers.
Getting started with Discovery Agents
Data is transmitted securely by the Discovery Agents to Application Discovery Service using Transport Layer Security (TLS) encryption. Agents are configured to upgrade automatically when new versions become available. You can change this configuration setting if desired.
curl -o ./aws-discovery-agent.tar.gz https://s3-us-west-2.amazonaws.com/aws-discovery-agent.us-west-2/linux/latest/aws-discovery-agent.tar.gz
- Alternatively you can install discovery agents using by going into the Migration Hub console navigation pane, under Discover, choose Tools, and then choose Download agent on the AWS Discovery Agent card.
- Install on Windows
- Data collected by Discovery Agent
- Start or stop Discovery Agent data collection:
- After you have successfully installed the agent, return to the in the Migration Hub console navigation pane, under Discover choose Data Collectors.
- Choose the Agents tab.
- Choose Start data collection or Stop data collection.
To discover resources using an agent
- Then, refresh your internet browser.
- On the Agents tab, select the agent(s) that you want to start.
- Choose Start data collection.
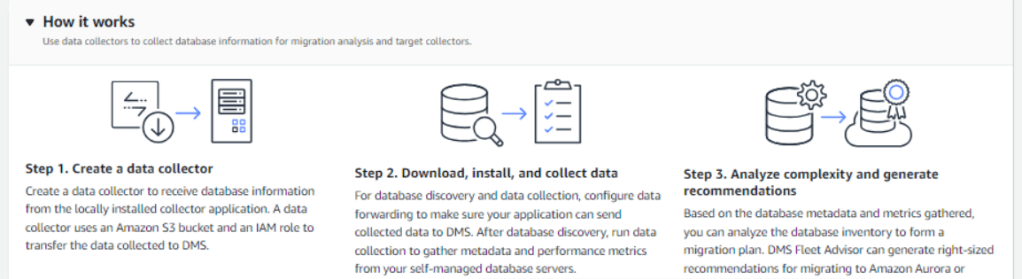
Getting started with Migration Evaluator
- Request a migration assessment: To start creating an assessment, please fill in the form below to make a request.
- Inventory discovery: Shortly after you make a request for a business case, you will receive an email to upload existing data or use a collector to discover the data needed to build your assessment.
- Receive results: Receive your Quick Insights report, business case, and detailed export. See how you can reduce costs by migrating to AWS.
Migrate to AWS using Migration Hub migration tools and tracking
Discovering your servers first is an optional starting point for migrations, gathering detailed server information, and then grouping the discovered servers into applications to be migrated and tracked. Migration Hub also gives you the choice to start migrating right away and to group servers during migration.
You can start migrating with or without first using the Migration Hub discovery tools. Directly migrating servers is efficient because your servers are migrating while you simultaneously group them into applications.
Migrate using Migration Hub migration tools
This section describes how to use the AWS Migration Hub to migrate your on-premises servers and application resources to AWS and how to track the migration.
- Step 1: Connect migration tools to Migration Hub
- In the Migration Hub console navigation pane under Migrate, choose Tools.
- Decide upon which AWS migration tool to use to migrate your application.
- Choose Connect in the box to authorize the migration tool you selected to communicate with Migration Hub.

- Step 2: Migrate using the connected migration tools
- In the Migration Hub console navigation pane under Migrate, choose Tools.
- After you connect (authorize) an AWS migration tool, choose the console link for the tool.
- After you link to the tool’s console, follow the migration instructions for your selected migration tool as migration happens outside of Migration Hub.
- After your application’s migration has started, return to the Migration Hub console.
- Step 3: Group servers as applications
- In the Migration Hub console navigation pane, under Discover, choose Servers.
- In the severs list, select each of the servers that you want to group into a new or existing application.
- Create your application, or add to an existing one, by choosing Group as application.
- In the Group as application dialog box, select either Group as a new application or Add to an existing application.
- Choose Save. A green confirmation message appears at the top of the screen.
After migration you can Track the status of your migrations in Migration Hub.
Track the status of your migrations in Migration Hub
With a migration underway, you can track its progress status as well as details for each server grouped to the application. This status is communicated to Migration Hub from the migration tool at key points during the migration.
To track an application’s migration status
- After your application’s migration has started, return to Migration Hub console and then choose Dashboard in the navigation pane.
- Under Most recently updated applications, choose the name of your migrating application.
- The first time a migration task is started for a server associated with the application, applications with this server will change to the In progress status, automatically.
- Choose Confirm. A green confirmation message appears at the top of the screen, and the status label changes to In progress.
- When the data in the application’s detail screen indicates migration has completed, and you’ve performed testing and verification, change the status from In progress to Completed from the Update status menu.
- Choose Confirm. A green confirmation message appears at the top of the screen, and the status label changes to Completed.
Note: Migration Hub Orchestrator offers predefined templates to create a migration workflow that can be customized to fit your unique migration requirements
IAM Policy for AWS Migration Hub
Migration Hub requires access to the Application Discovery Service on your behalf. To achieve this we need AWSServiceRoleForMigrationHub service linked role to have IAM policy named AWSApplicationDiscoveryServiceFullAccess to be attached along with trust role.
{
    "Version": "2012-10-17",
    "Statement": [
        {
            "Effect": "Allow",
            "Action": [
                "discovery:ListConfigurations",
                "discovery:DescribeConfigurations"
            ],
            "Resource": [
                "*"
            ]
        },
        {
            "Effect": "Allow",
            "Action": "ec2:CreateTags",
            "Resource": [
                "arn:aws:ec2:*:*:instance/*",
                "arn:aws:ec2:*:*:image/*"
            ],
            "Condition": {
                "ForAllValues:StringEquals": {
                    "aws:TagKeys": "aws:migrationhub:source-id"
                }
            }
        },
        {
            "Effect": "Allow",
            "Action": "dms:AddTagsToResource",
            "Resource": [
                "arn:aws:dms:*:*:endpoint:*"
            ],
            "Condition": {
                "ForAllValues:StringEquals": {
                    "aws:TagKeys": "aws:migrationhub:source-id"
                }
            }
        }
    ]
}
{
    "Version": "2012-10-17",
    "Statement": [
        {
            "Effect": "Allow",
            "Principal": {
                "Service": "migrationhub.amazonaws.com"
            },
            "Action": "sts:AssumeRole",
            "Condition": {
                "StringEquals": {
                    "aws:SourceAccount": "account-id"
                },
                "StringLike": {
                    "aws:SourceArn": "arn:aws:mgh:region:account-id:*"
                }
            }
        }
    ]
}
Conclusion
In this wonderful article you learnt about AWS Migration Hub which centrally manages all the on premises or data center migrations to AWS Cloud.
