
If you are looking to start your career in AWS cloud then knowing your first service that is AWS EC2 can give you a good understanding around the compute resources in AWS cloud. With AWS EC2 you will also understand which all services utilize AWS EC2.
Lets get and start learning AWS EC2.
Table of Content
- Amazon EC2 (AWS Elastic compute Cloud)
- Amazon EC2 (AWS Elastic compute Cloud)
- Pricing of Amazon Linux 2
- Configure SSL/TLS on Amazon Linux 2
- How to add extra AWS EBS Volumes to an AWS EC2 instance
- AMI (Amazon Machine Image)
- Features of AMI
- AMI Lifecycle
- Creating an Amazon EBS Backed Linux AMI
- Creating an Instance Store backed Linux AMI
- Copying an Amazon AMI
- Storing and restoring an Amazon AMI
- Amazon Linux 2
- AWS Instances
- Stop/Start Instance EBS Backed instance
- Reboot AWS EC2 Instance
- Hibernated Instance ( EBS Backed instance)
- Terminated Instance EBS Backed instance
- AWS Instance types
- AWS Instance Lifecycle
- Monitoring AWS EC2 instance
- Cloud-init
- AWS EC2 Monitoring
- AWS EC2 Networking
- Local Zones
- AWS Wavelength
- Elastic Network Interface
- Configure your network interface using ec2-net-utils for Amazon Linux
- IP Address
- Assign a secondary private IPv4 address
- What is Elastic IP address?
- Associate an Elastic IP address with the secondary private IPv4 address
- Conclusion
Amazon EC2 (AWS Elastic compute Cloud)
Amazon EC2 stands for Amazon Elastic compute cloud that allows you to launch servers or virtual machines that are scalable in the Amazon Web service cloud. Also, with AWS EC2 instance, you don’t require to invest in any hardware or electricity costs, and you just pay for what you use.
When required, you can quickly decrease or scale up the number of AWS EC2 instances.
- Instance requires operating systems, additional software, etc to get launched, so they use Preconfigured templates known as Amazon machine images (AMI).
- You can work with various configurations with respect to computing such as Memory or CPU for that you will need to select the appropriate instance_type.
- To securely log in to these instances you will need to generate the key pair where you store the private key and AWS manages key.
- Instance can have two types of data ie. instance store that is temporary and the Amazon Elastic block store also known as EBS volumes.
Amazon EC2 (AWS Elastic compute Cloud)
- Provides scalable computing capacity in Amazon web service cloud. You don’t need to invest in hardware up front etc. It takes few mins to launch your virtual machine and deploy your applications.
- You can use preconfigured templates known as Amazon machine images (AMI’s) that includes OS and additional software’s. The launched machines are known as instances and instances comes with various compute configurations such as CPU, Memory known as instance type.
- To securely login you need to key pairs where public key is stored with AWS and private key is stored with customers. Key pair choose either RSA or ED25519 types where windows doesn’t support ED25519.
- To use a key on mac or Linux computer grant the following permissions:
chmod 400 key-pair-name.pem
- Storage volumes for temporary data can use Instance store volumes however when you need permanent data then consider using EBS i.e., Elastic block store.
- To secure your Instance consider using security groups.
- If you need to allocate the static IP address to an instance, then consider using Elastic address.
- Your instance can be EBS backed instance or instance store-based instance that means the root volume can be either EBS or the Instance store. Instance stored backed Instances are either running or terminated but cannot be stopped. Also, instance attributes such as RAM, CPU cannot be changed.
- Instances launched from an Amazon EBS-backed AMI launch faster than instances launched from an instance store-backed AMI
- When you launch an instance from an instance store-backed AMI, all the parts have to be retrieved from Amazon S3 before the instance is available. With an Amazon EBS-backed AMI, only the parts required to boot the instance need to be retrieved from the snapshot before the instance is available
- Use Amazon Inspector to automatically discover software vulnerabilities and unintended network exposure.
- Use Trusted advisor to inspect your environment.
- Use separate Amazon EBS volumes for the operating system versus your data.
- Encrypt EBS volumes and snapshots.
- Regularly back up your EBS volumes using EBS Snapshots, create AMI’s from your instance.
- Deploy critical applications across multiple AZ’s.
- Set TTL to 255 or nearby on your application side so that the connection are intact otherwise it can cause reachability issues.
- When you install Apache then you will have document root on /var/www/html directory and by default root user have access to this directory. But if you want any other use to access these files under the directory perform the below steps as below. Let’s assume the user is ec2-user
- To create estimates for your AWS EC2 service use the AWS Pricing Calculator.
- Use AWS Security Hub controls to monitor your Amazon EC2 resources against security best practices and security standards.
- Use AWS Trusted Advisor to inspect your AWS environment, and then make recommendations when opportunities exist to save money, improve system availability and performance, or help close security gaps.
sudo usermod -a -G apache ec2-user  # Logout and login back
sudo chown -R ec2-user:apache /var/www
sudo chmod 2775 /var/www && find /var/www -type d -exec sudo chmod 2775 {} \;  # For Future files
Pricing of Amazon Linux 2
To create estimates for your AWS EC2 service use the AWS Pricing Calculator. To see your bill, go to the Billing and Cost Management Dashboard in the AWS Billing and Cost Management console. Your bill contains links to usage reports that provide details about your bill. You can use AWS Cost Explorer to analyze the cost and usage of your EC2 instances.
There are different plans available for different EC2 instance such as:
- On demand Instances: No longer commitments and you only pay per second and the minimum period should be 60 seconds.
- Saving Plans: You can book your instance for a year or 3 years.
- Reserved instances: You can book your instance for a year or a period of 3 years to a specific configuration.
- Spot instances: If you need cheap instance which are unused you can go ahead and use them.
- When the instance is in stopped state or terminated state or shutting down then the cost is not incurred.
Configure SSL/TLS on Amazon Linux 2
- SSL/TLS creates an encrypted channel between a web server and web client that protects data in transit from being eavesdropped on.
- Make sure you have EBS backed Amazon Linux 2, Apache installed, TLS Public Key Infrastructure (PKI) relies on DNS. Also make sure to register domain for your EC2 instance.
- Nowadays we are using TLS 1.2 and 1.3 versions and underlying TLS library is supported and enabled.
- Enable TLS on server by Installing Apache SSL module using below command followed by configuring it.
 yum install -y mod_ssl

vi  etc/httpd/conf.d/ssl.conf
- Generate certificate using
sudo ./make-dummy-cert localhost.crt inside cd /etc/pki/tls/certs
How to add extra AWS EBS Volumes to an AWS EC2 instance
Basically this section is to add the Extra volume to an instance. There are two types of volumes first is root volume and other is extra volume (EBS) which you can add. To add the extra volume on AWS EC2 below are the steps:
- Launch one AWS EC2 instance and while launching under Configure storage, choose Add new volume. Ensure that the added EBS volume size is 8 GB, and the type is
gp3. AWS EC2 instance will have two volumes one for root and other added storage. - Before modifying or updating the volume, make sure to take the snapshot of current vol by navigating to storage tab under EC2 and then block devices, volume ID.
- Now create a file system and attach it to non-mounted EBS volume by running the following command.
sudo mkfs -t xfs /dev/nvme1n1
sudo mkdir /data
sudo mount /dev/nvme1n1 /data
lsblk -f
Note: After you attach an Amazon EBS volume to your instance, it is exposed as a block device. You can format the volume with any file system and then mount it. After you make the EBS volume available for use, you can access it in the same ways that you access any other volume. Any data written to this file system is written to the EBS volume and is transparent to applications using the device.
- Now, again on AWS EC2 instance go to volume ID, click on Modify the Volume by changing the volume ID.
- Extend the file system by first checking the size of the file system.
df -hT
- Now to extend use the command:
sudo xfs_grofs -d /data
- Again, check the file system sized by running (df -hT) command
You can delete the root volume with Root volume types as AWS EBS with following ways:
- Restore a root volume to its launch state
- Replace a root volume using a snapshot
- Replace a root volume using an AMI
AMI (Amazon Machine Image)
- You can launch multiple instances using the same AMI. Ami includes EBS snapshots and also contains OS, software’s for instance store backed AMI’s.
To Describe the AMI you can run the below command.
aws ec2 describe-images --region us-east-1 --image-ids ami-1234567890EXAMPLE
Features of AMI
- You can create an AMI using snapshot or a template. Also you can deregister the AMI as well.
- AMI’s are either EBS backed or instance backed.
- With EBS backed AMI’s the Root volume is terminated and other EBS volume is not deleted.
- When you launch an instance from an instance store-backed AMI, all the parts have to be retrieved from Amazon S3 before the instance is available.
- With an Amazon EBS-backed AMI, only the parts required to boot the instance need to be retrieved from the snapshot before the instance is available.
- Cost of EBS backed Instance are less because only changes are stored but in case of Instance store backed instances each time customized AMI is stored in AWS S3.
- AMI uses two types of virtualizations: paravirtual (PV) or Hardware virtual machine (HVM) which is better performer.
- HVM are treated like actual physical disks. The boot process is similar to bare metal operating system.
- The most common HVM bootloader is GRUB or GRUB2.
- HVM boots by executing master boot record of root block device of your image.
- HVM allows you to run OS on top of VM as if its bare metal hardware.
- HVM can take advantage of hardware extensions such as enhanced networking or GPU Processing
- PV boots with special boot loader called PV-GRUB.
- PV runs on hardware that doesn’t have explicit support for virtualization.
- PV cannot take advantage of hardware extensions.
- All current, regions, generations support HVM API however this is not true with PV.
- The first component to load when you start a system is BIOS in case of [ Intel and AMD] instance types run on Legacy and UEFI and Unified Extensible Firmware Interface (UEFI) in case of Graviton instance. UEFI boot is not supported in Local Zones, Wavelength Zones, or with AWS Outposts.
- In Amazon EC2, two variants of the boot mode software are supported: Unified Extensible Firmware Interface (UEFI) and Legacy BIOS.
- To check the boot mode of an AMI run the below command. Note: To check the boot mode of an Instance you can run the describe instance command.
aws ec2 --region us-east-1 describe-images --image-id ami-0abcdef1234567890
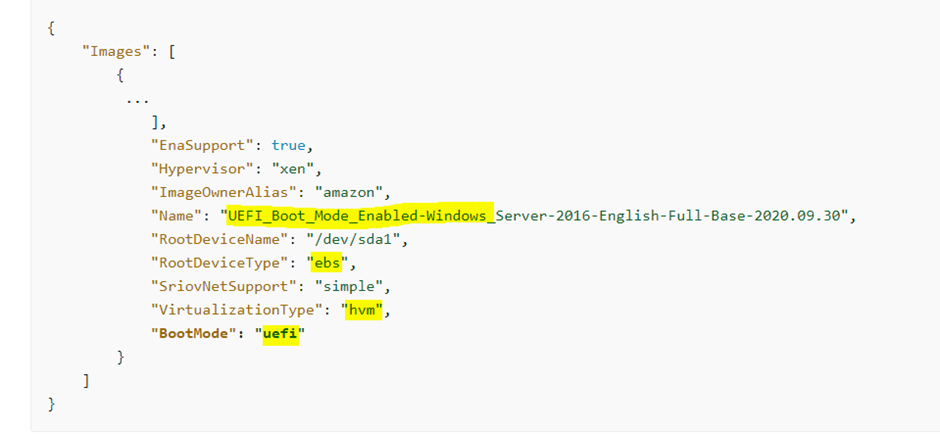
- To check the boot mode of Operating system, SSH into machine and then run the below command.
sudo /usr/sbin/efibootmgr
- To set the boot mode you can do that while registering an image not while creating an image.
- Shared AMI: These are created by developers and made available for others to use.
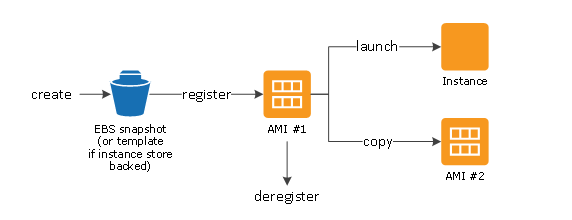
- You can deprecate or Deregister the AMI anytime.
- Recycle Bin is a data recovery feature that enables you to restore accidentally deleted Amazon EBS snapshots and EBS-backed AMIs. Provided you have permissions such as
ec2:ListImagesInRecycleBin and ec2:RestoreImageFromRecycleBin
AMI Launch permissions
The owner of an AMI determines its availability by specifying launch permissions. Launch permissions fall into the following categories.
| Launch permission | Description |
|---|---|
| public | The owner grants launch permissions to all AWS accounts. |
| explicit | The owner grants launch permissions to specific AWS accounts, organizations, or organizational units (OUs). |
| implicit | The owner has implicit launch permissions for an AMI. |
AMI Lifecycle
You can launch two types of AMI’s:
- Create an Amazon EBS-backed Linux AMI
- Create an instance store-backed Linux AMI
Creating an Amazon EBS Backed Linux AMI
- Launch an instance1 using AMI (Marketplace, Your own AMI, Public AMI, Shared AMI)
- Customize the instance by adding the software’s etc.
- Create new image from customized instance. When you create a new image then you create a new AMI as well. Amazon EC2 creates snapshots of your instance’s root volume and any other EBS volumes attached to your instance
- Launch another instance2

Creating an Instance Store backed Linux AMI
- Launch an instance1 only from instance backed AMI.
- SSH Into Instance, customize it.
- Bundle it which contains image manifest and files that contain template for root volume. Bundling might take few minutes.
- Next upload the bundle to AWS S3.
- Now, register your AMI.
Note 1: To create and manage Instance store backed Linux AMI you will need AMI tools to create and manage instance store-backed Linux AMIs. You will also need AWS CLI and AWS S3 bucket.
Note 2: You can’t convert an instance store-backed Windows AMI to an Amazon EBS-backed Windows AMI and you cannot convert an AMI that you do not own.

Copying an Amazon AMI
- You can copy AMI’s within region or across regions.
- You can also copy AMI along with encrypted snapshot.
- When you copy Ami the target AMI has its own identifier.
- Make sure your IAM principal has the permissions to copy AMI.
- Provide or update Bucket policy so that new AMI can be copied successfully.
- You can copy an AMI in another region
- You can copy an AMI in another account. For copying the AMI across accounts make sure you have all the permissions such as Bucket permission, key permissions and snapshot permissions.
Storing and restoring an Amazon AMI
- You can store AMI’s in AWS S3 bucket by using CreatStoreImageTask API
- To monitor the progress of AMI use DescribeStoreImageTask
- copy AMI to another bucket.
- You can restore only EBS backed AMI’s using CreateRestoreImageTask.
- To store and restore AMI the S3 bucket must be in same region.
Amazon Linux 2
- It supports kernel 4.14 and 5.10. You can also upgrade it to 5.15 version. It allows greater parallelism and scalability.
- New improvements in EXT file system such as large files can be managed easily.
- DAMON is better supported as the data access monitoring for better memory and performance analysis.
- To install and verify by upgrading kernel use below command.
sudo amazon-linux-extras install kernel-5.15
- The cloud-init package is an open-source application built by Canonical that is used to bootstrap Linux images in a cloud computing environment, such as Amazon EC2. It enables you to specify actions that should happen to your instance at boot time.
- Amazon Linux also uses cloud-init package to perform initial configuration of the ec2-user account, setting hostname, generate host keys, prepare repositories for package management.
- Add users public key,
- Amazon Linux uses the cloud-init actions found in
/etc/cloud/cloud.cfg.dand/etc/cloud/cloud.cfg. You can create your own cloud-init action files in/etc/cloud/cloud.cfg.d.
AWS Instances
An instance is a virtual server in the cloud. Instance type essentially determines the hardware of the host computer used for your instance. Each instance type offers different compute and memory capabilities.
The root device for your instance contains the image used to boot the instance. The root device is either an Amazon Elastic Block Store (Amazon EBS) volume or an instance store volume.
Your instance may include local storage volumes, known as instance store volumes, which you can configure at launch time with block device mapping
Stop/Start Instance EBS Backed instance:
- All the storage and EBS Volumes remains as it is ( they are stopped not deleted).
- You are not charged for the instance when it is in stopped stage.
- All the EBS volumes including root device usage are billed.
- During the instance in stopped stage you can attach or detach EBS volumes.
- You can create AMI’s during stopped state and you can also configure few instance configurations such as kernel, RAM Disk and instance type.
- The Elastic IP address remains associated from the instance
- The instance stays on the same host computer
- The RAM is erased
- Instance store volumes data is erased
- You stop incurring charges for an instance as soon as its state changes to
stopping
Reboot AWS EC2 Instance
- The instance stays on the same host computer
- The Elastic IP address remains associated from the instance
- The RAM is erased
- Instance store volumes data is preserved
Hibernated Instance ( EBS Backed instance)
- The Elastic IP address remains associated from the instance
- We move the instance to a new host computer
- The RAM is saved to a file on the root volume
- Instance store volumes data is erased
- You incur charges while the instance is in the
stoppingstate, but stop incurring charges when the instance is in thestoppedstate
Terminated Instance EBS Backed instance:
- The root volume device is deleted but any other EBS volumes are preserved.
- Instances are also terminated and cannot be started again.
- You are not charged for the instance when it is in stopped stage.
- The Elastic IP address is disassociated from the instance.
AWS Instance types
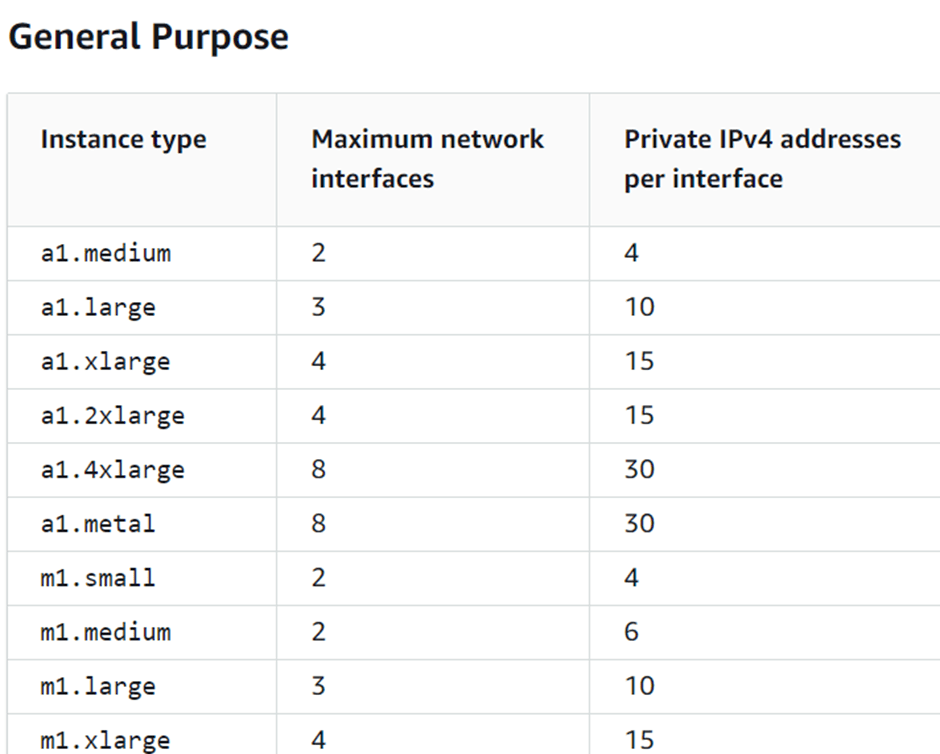
- General Purpose: These instances provide an ideal cloud infrastructure, offering a balance of compute, memory, and networking resources for a broad range of applications that are deployed in the cloud.
- Compute Optimized instances: Compute optimized instances are ideal for compute-bound applications that benefit from high-performance processors.
- Memory optimized instances: Memory optimized instances are designed to deliver fast performance for workloads that process large data sets in memory.
- Storage optimized instances: Storage optimized instances are designed for workloads that require high, sequential read and write access to very large data sets on local storage. They are optimized to deliver tens of thousands of low-latencies, random I/O operations per second (IOPS) to applications
Note: EBS-optimized instances enable you to get consistently high performance for your EBS volumes by eliminating contention between Amazon EBS I/O and other network traffic from your instance.
You can enable enhanced networking on supported instance types to provide lower latencies, lower network jitter, and higher packet-per-second (PPS) performance
AWS EC2 Instance purchasing options
Amazon EC2 provides the following purchasing options to enable you to optimize your costs based on your needs:
- On-Demand Instances – Pay, by the second, for the instances that you launch.
- Savings Plans – Reduce your Amazon EC2 costs by making a commitment to a consistent amount of usage, in USD per hour, for a term of 1 or 3 years.
- Reserved Instances – Reduce your Amazon EC2 costs by making a commitment to a consistent instance configuration, including instance type and Region, for a term of 1 or 3 years.
- Spot Instances – Request unused EC2 instances, which can reduce your Amazon EC2 costs significantly.
- Dedicated Hosts – Pay for a physical host that is fully dedicated to running your instances, and bring your existing per-socket, per-core, or per-VM software licenses to reduce costs.
- Dedicated Instances – Pay, by the hour, for instances that run on single-tenant hardware.
- Capacity Reservations – Reserve capacity for your EC2 instances in a specific Availability Zone.
AWS Instance Lifecycle
The lifecycle of an instance starts when it is launched and ends when it is terminated.
- Note: You cannot stop and then start an Instance store backed instance.
- FROM AMI
- Launch Instance
- Pending
- Running to Rebooting or Stopping
- Shutting Down
- Terminated
- Shutting Down
- Running to Rebooting or Stopping
Amazon EC2 instances support multithreading, which enables multiple threads to run concurrently on a single CPU core. Each thread is represented as a virtual CPU (vCPU) on the instance. An instance has a default number of CPU cores, which varies according to instance type. For example, an m5.xlarge instance type has two CPU cores and two threads per core by default—four vCPUs in total.
- Number of CPU cores: You can customize the number of CPU cores for the instance. You might do this to potentially optimize the licensing costs of your software with an instance that has sufficient amounts of RAM for memory-intensive workloads but fewer CPU cores.
- Threads per core: You can disable multithreading by specifying a single thread per CPU core. You might do this for certain workloads, such as high performance computing (HPC) workloads.
Steps to connect your EC2 instance and RDS database
To automatically connect an EC2 instance to an RDS database using the EC2 console
- On the instance launch confirmation page (it should be open from the previous task), choose Connect an RDS database.If you closed the confirmation page, follow these steps:
- Open the Amazon EC2 console at https://console.aws.amazon.com/ec2/.
- In the navigation pane, choose Instances.
- Select the EC2 instance that you just created, and then choose Actions, Networking, Connect RDS database.If Connect RDS database is not available, check that the EC2 instance is in the Running state.
- For Database role, choose Instance. Instance in this case refers to the database instance.
- For RDS database, choose the RDS database that you created in Task 1.
- Choose Connect.

EC2 Fleet and Spot Fleet
EC2 Fleet and Spot Fleet are designed to be a useful way to launch a fleet—or group—of instances with AWS. Each instance in a fleet is based on a launch template or a set of launch parameters that you configure manually at launch.
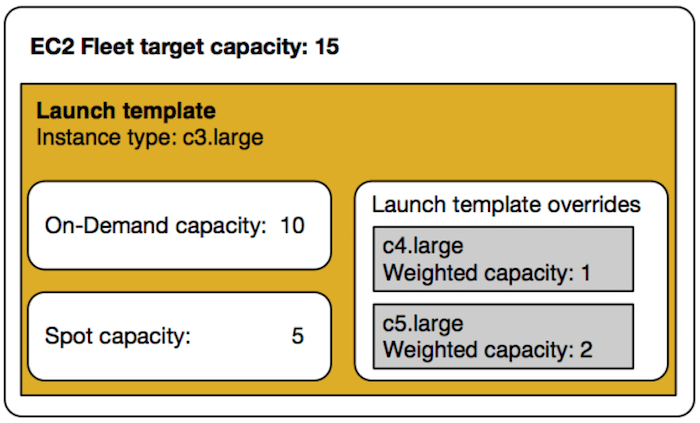
Below are the following features and benefits of EC2 fleet and Spot fleet:
- Multiple instance types and purchase options: In a single API call, a fleet can launch multiple instance types and purchase options
- Distributing instances across Availability Zones: A fleet automatically attempts to distribute instances evenly across multiple Availability Zones for high availability.
- Automated replacement of Spot Instances
- To start using an EC2 Fleet, you create a request that includes the total target capacity, On-Demand capacity, Spot capacity, one or more launch specifications for the instances, and the maximum price that you are willing to pay.
Create a launch template from parameters
To create a launch template using the console
- Open the Amazon EC2 console.
- In the navigation pane, choose Launch Templates, and then choose Create launch template.
- The launch template parameters are grouped. For details about each group see the sections below.
- Use the Summary panel to review your launch template configuration. You can navigate to any section by choosing its link and then make any necessary changes.
- When you’re ready to create your launch template, choose Create launch template.
How to Create an EC2 Fleet
To create an EC2 Fleet, you need only specify the following parameters:
- LaunchTemplateId or LaunchTemplateName – Specifies the launch template to use (which contains the parameters for the instances to launch, such as the instance type, Availability Zone, and the maximum price you’re willing to pay)
- TotalTargetCapacity – Specifies the total target capacity for the fleet
- DefaultTargetCapacityType – Specifies whether the default purchasing option is On-Demand or Spot
To create an EC2 Fleet (AWS CLI) use the below command.
aws ec2 create-fleet --cli-input-json file://file_name.json

aws ec2 describe-fleets   # Describe the EC2 fleet
How to Modify an EC2 Fleet using AWS CLI
aws ec2 modify-fleet --fleet-id fleet-XXXXXX --target-capacity-specification TotalTargetCapacity=20
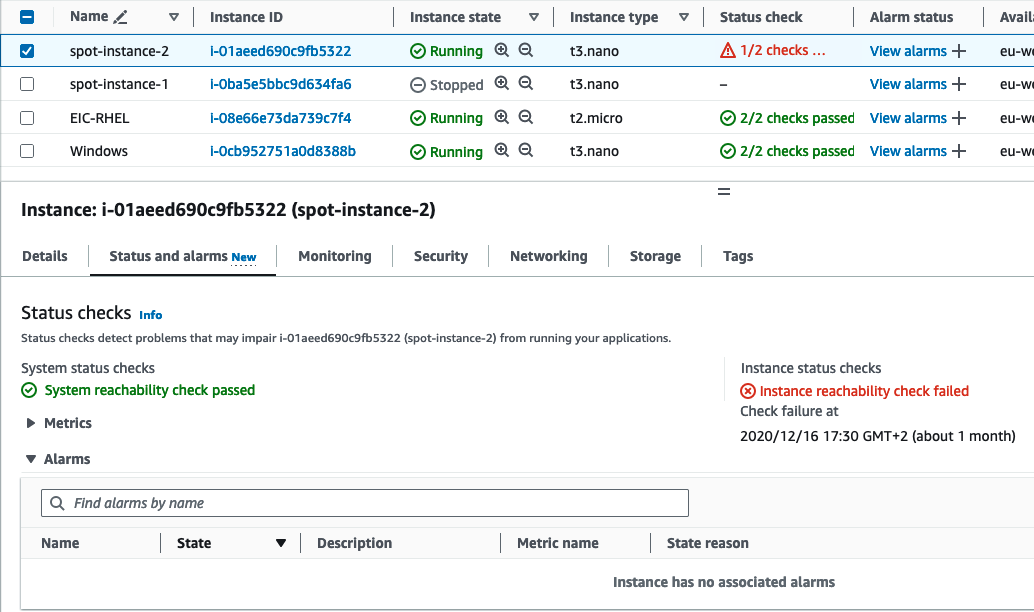
Monitoring AWS EC2 instance
You can monitor AWS EC2 instances either manually or automatically. Lets discuss few of Automated monitoring tools.
- System status checks
- Instance status checks
- Attached EBS status checks
To view status checks, use one of the following methods. Open the Amazon EC2 console.
- In the navigation pane, choose Instances.
- On the Instances page, the Status check column lists the operational status of each instance.
- To view the status of a specific instance, select the instance, and then choose the Status and alarms tab.
- Amazon Cloud watch alarms
- Amazon Event Bridge
- Amazon CloudWatch Logs
- Cloud Watch agent
Now, lets discuss few of manual tools to monitor AWS EC2 instance.
- Amazon EC2 Dashboard.
- Amazon CloudWatch Dashboard
- Instance Status Checks on the EC2 Dashboard.
- Scheduled events on EC2 Dashboard.
Cloud-init
It is used to bootstrap the Linux images in cloud computing environment. Amazon Linux also uses cloud-init to perform initial configuration of the ec2-user account. Amazon Linux uses the cloud-init actions found in /etc/cloud/cloud.cfg.d and /etc/cloud/cloud.cfg and you can also add your own actions in this file.
The tasks that are performed by default by this script.
- Set the default locale.
- Set the hostname.
- Parse and handle user data.
- Generate host private SSH keys.
- Add a user’s public SSH keys to
.ssh/authorized_keysfor easy login and administration. - Prepare the repositories for package management.
- Handle package actions defined in user data.
- Execute user scripts found in user data.
AWS EC2 Monitoring
- By default, AWS EC2 sends metrics to CloudWatch every 5 mins.
- To send metric data for your instance to CloudWatch in 1-minute periods, you can enable detailed monitoring on the instance but You are charged per metric that is sent to CloudWatch.
To enable detailed monitoring for an existing instance
- Open the Amazon EC2 console at https://console.aws.amazon.com/ec2/.
- In the navigation pane, choose Instances.
- Select the instance and choose Actions, Monitor and troubleshoot, Manage detailed monitoring.
- On the Detailed monitoring detail page, for Detailed monitoring, select the Enable check box.
- Choose Save.
- To list all the metrics of a particular AWS EC2 instance use the below command.
aws cloudwatch list-metrics --namespace AWS/EC2 --dimensions Name=InstanceId,Value=i-1234567890abcdef0
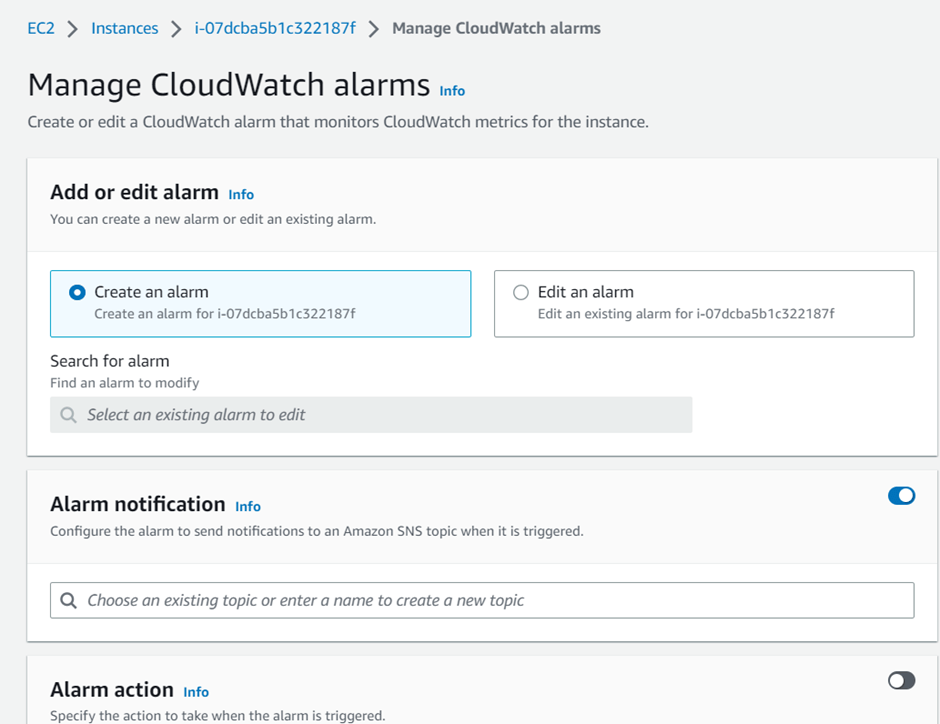
To create CloudWatch alarms, you can Select the instance and choose Actions, Monitor and troubleshoot, Manage CloudWatch alarms.
- You can use Amazon EventBridge to automate your AWS services and respond automatically to system events, such as application availability issues or resource changes.
- Events from AWS services are delivered to Event Bridge in near real time. For example: Activate a Lambda function whenever an instance enters the running state. Create events and rules on event on AWS EC2 service. Once generated then it will run the lambda function.
Create an EventBridge rule to send a notification
The following example creates an EventBridge rule to send an email, text message, or mobile push notification when any AMI is in the available state after the CreateImage operation has completed successfully.
Before creating the EventBridge rule, you must create the Amazon SNS topic for the email, text message, or mobile push notification.
To create an EventBridge rule to send a notification when an AMI is created and in the available state
- Open the Amazon EventBridge console at https://console.aws.amazon.com/events/.
- Choose Create rule.
- For Define rule detail, do the following:
- Enter a Name for the rule, and, optionally, a description.A rule can’t have the same name as another rule in the same Region and on the same event bus.
- For Event bus, choose default. When an AWS service in your account generates an event, it always goes to your account’s default event bus.
- For Rule type, choose Rule with an event pattern.
- Choose Next.
- For Build event pattern, do the following:
- For Event source, choose AWS events or EventBridge partner events.
- For Event pattern, for this example you’ll specify the following event pattern to match any
EC2 AMI State Changeevent that is generated when an AMI enters theavailablestate.
{
 "source": ["aws.ec2"],
 "detail-type": ["EC2 AMI State Change"],
 "detail": {"State": ["available"]}
}
- Choose Next.
- For Select target(s), do the following:
- For Target types, choose AWS service.
- For Select a target, choose SNS topic to send an email, text message, or mobile push notification when the event occurs.
- For Topic, choose an existing topic. You first need to create an Amazon SNS topic using the Amazon SNS console.
- (Optional) Under Additional settings, you can optionally configure additional settings. For more information.
- Choose Next.
- (Optional) For Tags, you can optionally assign one or more tags to your rule, and then choose Next.
- For Review and create, do the following:
- Review the details of the rule and modify them as necessary.
- Choose Create rule.
- You can use the Cloud Watch agent to collect both system metrics and log files from Amazon EC2 instances and on-premises servers
sudo yum install amazon-cloudwatch-agent
Log Amazon EC2 API calls using AWS CloudTrail
The Amazon EC2 API is integrated with AWS CloudTrail, a service that provides a record of actions taken by a user, role, or an AWS service. CloudTrail captures all API calls for Amazon EC2 as events, including calls from the console and from code calls to the API operations.
CloudTrail is enabled on your AWS account when you create the account. When activity occurs in Amazon EC2 and Amazon EBS, that activity is recorded in a CloudTrail event along with other AWS service events in Event history.
When you create a trail, you enable ongoing delivery of events as log files to an Amazon S3 bucket that you specify. Creating a trail has many benefits, including:
- A record of events that extends past 90 days.
- The option to automatically monitor and alarm on specified events by sending log events to Amazon CloudWatch Logs.
- The option to query logs and analyze AWS service activity with Amazon Athena.
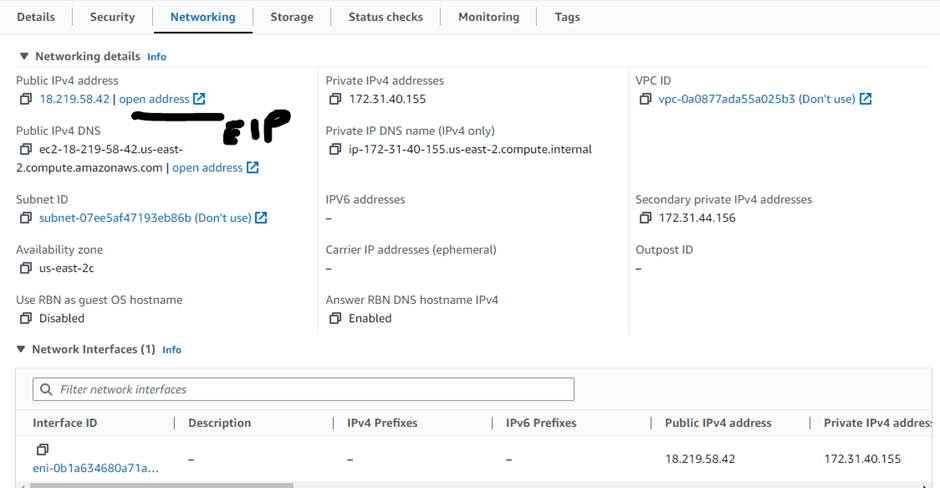
AWS EC2 Networking
If you require a persistent public IP address, you can allocate an Elastic IP address for your AWS account and associate it with an instance or a network interface.
To increase network performance and reduce latency, you can launch instances in a placement group
To increase network performance and reduce latency, you can launch instances in a placement group.
When you work with an instance using the command line interface or API actions, you must specify its Regional endpoint.
Local Zones
A Local Zone is an extension of an AWS Region in geographic proximity to your users. Local Zones have their own connections to the internet and support AWS Direct Connect, so that resources created in a Local Zone can serve local users with low-latency communications.

AWS Wavelength
AWS Wavelength enables developers to build applications that deliver ultra-low latencies to mobile devices and end users. Wavelength deploys standard AWS compute and storage services to the edge of telecommunication carriers’ 5G networks. Developers can extend a virtual private cloud (VPC) to one or more Wavelength Zones, and then use AWS resources like Amazon EC2 instances to run applications that require ultra-low latency and a connection to AWS services in the Region.
A Wavelength Zone is an isolated zone in the carrier location where the Wavelength infrastructure is deployed.

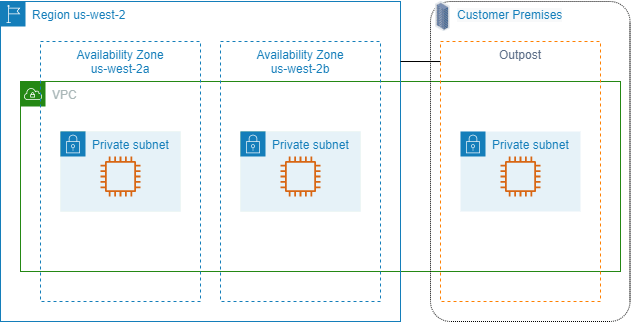
AWS Outposts
AWS Outposts is a fully managed service that extends AWS infrastructure, services, APIs, and tools to customer premises. By providing local access to AWS managed infrastructure, AWS Outposts enables customers to build and run applications on premises using the same programming interfaces as in AWS Regions, while using local compute and storage resources for lower latency and local data processing needs.
Elastic Network Interface
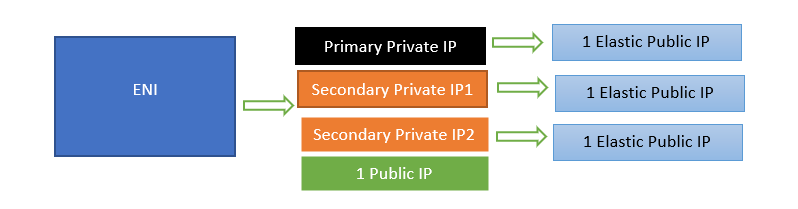
- Eni is basically a Virtual Network adapter which contains following attributes:
- 1 primary private IPv4
- 1 or more secondary private IPv4
- 1 Elastic IP per private IP
- One Public IPv4 address
- 1 Mac address
- You can create and configure network interfaces and attach them to instances in the same Availability Zone.
- The below diagram is just the one ENI ( Network card adapter) however for some of them have multiple adapters.
- Each instance has a default network interface, called the primary network interface.
- Each instance has a default network interface, called the primary network interface.
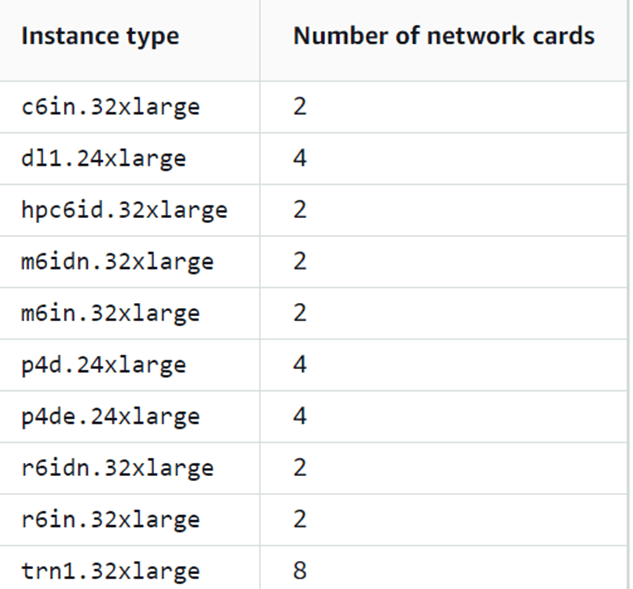
- Instances with multiple network cards provide higher network performance, including bandwidth capabilities above 100 Gbps and improved packet rate performance. All the instances have mostly one network card which has further ENI’s.
- The following instances support multiple network cards.
- You can attach a network interface to an instance when it’s running (hot attach), when it’s stopped (warm attach), or when the instance is being launched (cold attach).
- You can detach secondary network interfaces when the instance is running or stopped. However, you can’t detach the primary network interface.
Configure your network interface using ec2-net-utils for Amazon Linux
There is an additional script that is installed by AWS which is ec2-net-utils. To install this script, use the following command.
yum install e2-net-utils
To list the configuration files that are generated can be checked using the below command:
ls -l /etc/sysconfig/network-scripts/*-eth?
IP Address
- You can specify multiple private IPv4 and IPv6 addresses for your instances.
- You can assign a secondary private IPv4 address to any network interface. The network interface does not need to be attached to the instance.
- Secondary private IPv4 addresses that are assigned to a network interface can be reassigned to another one if you explicitly allow it.
- Although you can’t detach the primary network interface from an instance, you can reassign the secondary private IPv4 address of the primary network interface to another network interface.
- Each private IPv4 address can be associated with a single Elastic IP address, and vice versa.
- When a secondary private IPv4 address is reassigned to another interface, the secondary private IPv4 address retains its association with an Elastic IP address.
- When a secondary private IPv4 address is unassigned from an interface, an associated Elastic IP address is automatically disassociated from the secondary private IPv4 address.
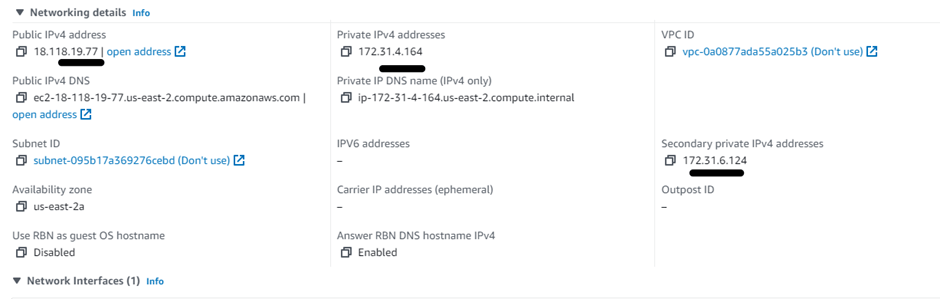
Assign a secondary private IPv4 address
- In EC2, choose Network Interfaces

- Allow secondary IP address.
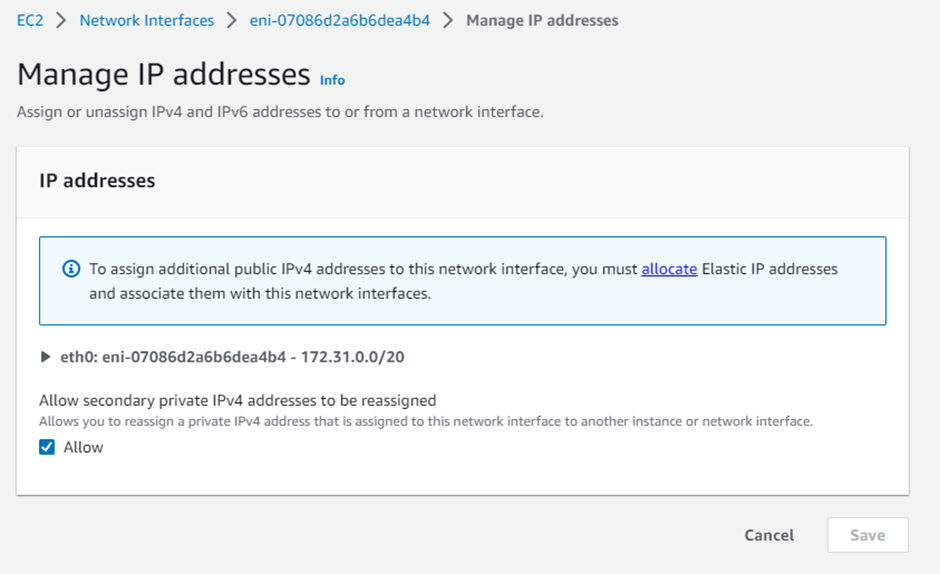
- Again verify in EC2 instance networking tab
What is Elastic IP address?
- Static Ip address
- It is region specific and cannot be moved to another region.
- First thing is to allocate to the account.
- When you associate an Elastic IP address with an instance, it is also associated with the instance’s primary network interface
Associate an Elastic IP address with the secondary private IPv4 address
- In the navigation pane, choose Elastic IPs.
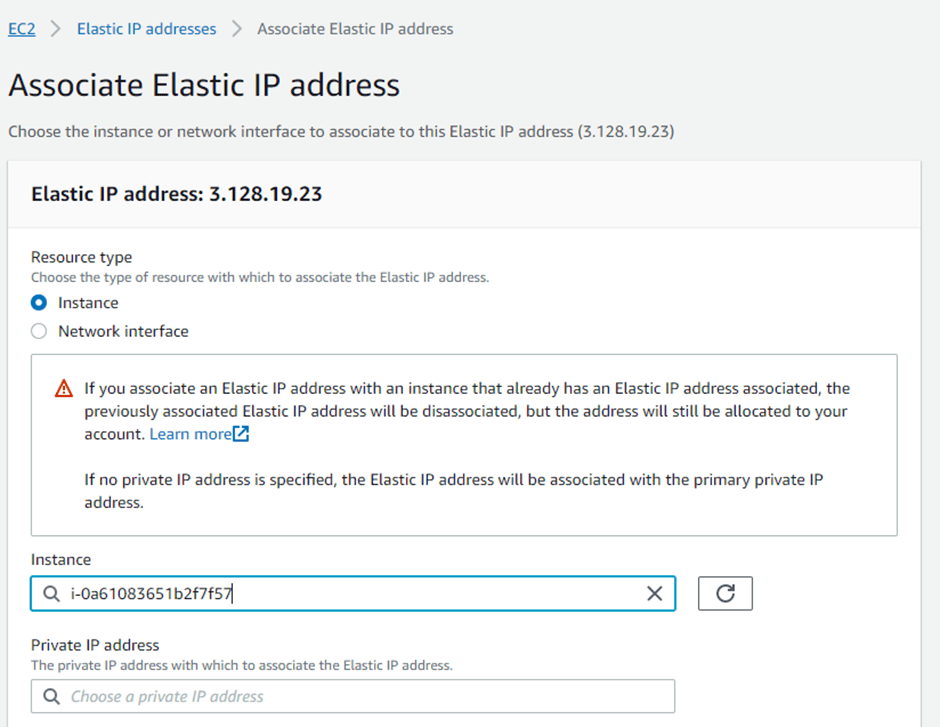
- Again verify in EC2 instance networking tab
EC2 IAM Policies
You must grant users the permissions they require for Amazon EC2 using IAM policies. The following examples show policy statements that you could use to control the permissions that users have to Amazon EC2.
- Grant a user permission to pass an IAM role to an instance
{
  "Version": "2012-10-17",
  "Statement": [
    {
      "Effect": "Allow",
      "Action": [
         "ec2:RunInstances",
         "ec2:AssociateIamInstanceProfile",
         "ec2:ReplaceIamInstanceProfileAssociation"
      ],
      "Resource": "*"
    },
    {
      "Effect": "Allow",
      "Action": "iam:PassRole",
      "Resource": "arn:aws:iam::123456789012:role/DevTeam*"
    }
  ]
}
- The following policy grants users permissions to use all Amazon EC2 API actions whose names begin with
Describe
{
   "Version": "2012-10-17",
   "Statement": [
    {
      "Effect": "Allow",
      "Action": "ec2:Describe*",
      "Resource": "*"
    }
   ]
}
- The following policy allows users to launch instances using only the
t2.microort2.smallinstance type, which you might do to control costs.
{
   "Version": "2012-10-17",
   "Statement": [
        {
      "Effect": "Allow",
      "Action": "ec2:RunInstances",
      "Resource": [
         "arn:aws:ec2:region:account-id:instance/*"
      ],
      "Condition": {
         "StringEquals": {
            "ec2:InstanceType": ["t2.micro", "t2.small"]
         }
      }
   },
   {
      "Effect": "Allow",
      "Action": "ec2:RunInstances",
      "Resource": [
         "arn:aws:ec2:region::image/ami-*",
         "arn:aws:ec2:region:account-id:subnet/*",
         "arn:aws:ec2:region:account-id:network-interface/*",
         "arn:aws:ec2:region:account-id:volume/*",
         "arn:aws:ec2:region:account-id:key-pair/*",
         "arn:aws:ec2:region:account-id:security-group/*"
         ]
      }
   ]
}
- To allow users to view all resources in the Amazon EC2 console, you can use the same policy as the following example.
{
   "Version": "2012-10-17",
   "Statement": [{
      "Effect": "Allow",
      "Action": [
         "ec2:DescribeInstances",
         "ec2:DescribeImages",
         "ec2:DescribeTags",
         "ec2:DescribeSnapshots"
      ],
      "Resource": "*"
   }
   ]
}
Managed Policies for AWS EC2
AmazonEC2ReadOnlyAccess
{
  "Version" : "2012-10-17",
  "Statement" : [
    {
      "Effect" : "Allow",
      "Action" : "ec2:Describe*",
      "Resource" : "*"
    },
    {
      "Effect" : "Allow",
      "Action" : "elasticloadbalancing:Describe*",
      "Resource" : "*"
    },
    {
      "Effect" : "Allow",
      "Action" : [
        "cloudwatch:ListMetrics",
        "cloudwatch:GetMetricStatistics",
        "cloudwatch:Describe*"
      ],
      "Resource" : "*"
    },
    {
      "Effect" : "Allow",
      "Action" : "autoscaling:Describe*",
      "Resource" : "*"
    }
  ]
}
AWSEC2FleetServiceRolePolicy
Allows EC2 Fleet to launch and manage instances. This policy is attached to a service-linked role that allows the service to perform actions on your behalf. You cannot attach this policy to your users, groups, or roles.
{
  "Version" : "2012-10-17",
  "Statement" : [
    {
      "Effect" : "Allow",
      "Action" : [
        "ec2:DescribeImages",
        "ec2:DescribeSubnets",
        "ec2:RequestSpotInstances",
        "ec2:DescribeInstanceStatus",
        "ec2:RunInstances"
      ],
      "Resource" : [
        "*"
      ]
    },
    {
      "Sid" : "EC2SpotManagement",
      "Effect" : "Allow",
      "Action" : [
        "iam:CreateServiceLinkedRole"
      ],
      "Resource" : "*",
      "Condition" : {
        "StringEquals" : {
          "iam:AWSServiceName" : "spot.amazonaws.com"
        }
      }
    },
    {
      "Effect" : "Allow",
      "Action" : [
        "iam:PassRole"
      ],
      "Resource" : [
        "*"
      ],
      "Condition" : {
        "StringEquals" : {
          "iam:PassedToService" : [
            "ec2.amazonaws.com",
            "ec2.amazonaws.com.cn"
          ]
        }
      }
    },
    {
      "Effect" : "Allow",
      "Action" : [
        "ec2:CreateTags"
      ],
      "Resource" : [
        "arn:aws:ec2:*:*:instance/*",
        "arn:aws:ec2:*:*:spot-instances-request/*"
      ]
    },
    {
      "Effect" : "Allow",
      "Action" : [
        "ec2:CreateTags"
      ],
      "Resource" : [
        "arn:aws:ec2:*:*:volume/*"
      ],
      "Condition" : {
        "StringEquals" : {
          "ec2:CreateAction" : "RunInstances"
        }
      }
    },
    {
      "Effect" : "Allow",
      "Action" : [
        "ec2:TerminateInstances"
      ],
      "Resource" : "*",
      "Condition" : {
        "StringLike" : {
          "ec2:ResourceTag/aws:ec2:fleet-id" : "*"
        }
      }
    }
  ]
}
Access Amazon EC2 using an interface VPC endpoint
You can improve the security posture of your VPC by creating a private connection between your VPC and Amazon EC2. You can access Amazon EC2 as if it were in your VPC, without the use of an internet gateway, NAT device, VPN connection, or AWS Direct Connect connection. Instances in your VPC don’t need public IP addresses to access Amazon EC2.
Create an interface endpoint for Amazon EC2 using the following service name:
- com.amazonaws.
region.ec2 — Creates an endpoint for the Amazon EC2 API actions.
An endpoint policy is an IAM resource that you can attach to your interface endpoint. The default endpoint policy allows full access to the Amazon EC2 API through the interface endpoint.
Conclusion
In the long ultimate guide we learned everything one must know about AWS EC2 in the AWS Cloud.
